
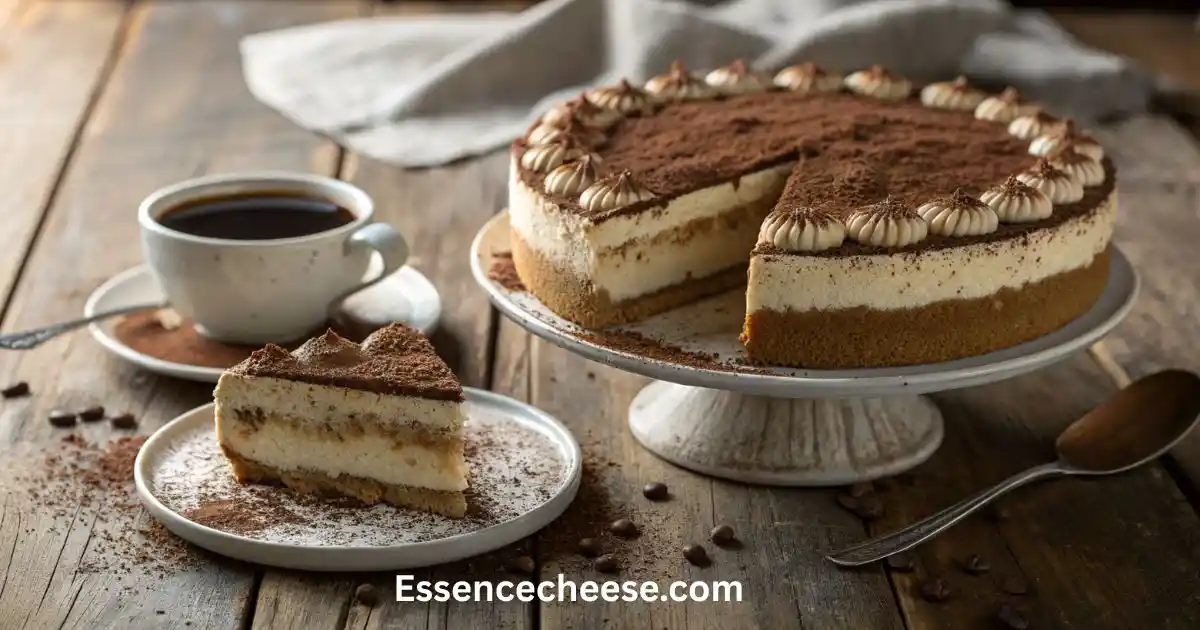
The Ultimate Tiramisu Cheesecake
Imagine the rich, coffee-soaked flavor of a classic Italian tiramisu meeting the creamy indulgence of a New York-style cheesecake. Every bite melts with smooth mascarpone, deep espresso, and a whisper of cocoa. It’s the kind of dessert that makes silence fall across the table as everyone takes their first forkful.
What makes this recipe special is that you don’t have to choose between baked and no-bake. This complete guide gives you both options in one place. Whether you love the dense, velvety texture of a baked cheesecake or prefer the light, mousse-like charm of a no-bake version, this page covers it all.
You’ll find two perfected recipes crafted for different moods and occasions. Alongside them, you’ll learn how to choose the best crust, fix common problems, and keep your tiramisu cheesecake flawless every time. This is your one-stop resource for mastering both versions with confidence and ease.
Table of Contents
Baked vs. No-Bake: Which Tiramisu Cheesecake is Right for You?
When it comes to tiramisu cheesecake, the first decision you’ll make is whether to bake it or keep it chilled. Both versions share that beautiful mix of coffee, mascarpone, and cocoa, but they deliver very different experiences. The baked version is rich and velvety with a slight tang from the cream cheese, while the no-bake version is light, creamy, and quick to prepare.
Below is a simple comparison to help you choose the perfect match for your taste, time, and occasion.
| Feature | Classic Baked Version | Easy No-Bake Version |
| Texture | Dense, ultra creamy, smooth like New York cheesecake | Light, airy, mousse-like, softer |
| Flavor | Deeper and richer with a mild tang from baking | Sweeter and more pronounced mascarpone flavor |
| Difficulty | Intermediate, needs an oven and an optional water bath | Beginner-friendly, no oven required |
| Time | About 90 minutes for prep and baking, plus overnight chill | Around 30 minutes for prep plus 6 to 8 hours chill |
| Best For | Holidays, dinner parties, special occasions | Summer desserts, quick gatherings, and new bakers |
Each version has its charm. The baked cheesecake is ideal when you want a showpiece that feels indulgent and traditional. The no-bake version is perfect for warm days or when you need an elegant dessert without turning on the oven.
Both share the same comforting tiramisu flavor but bring their own texture and style to the table.
The Secret to a Perfect Foundation: Choosing Your Crust
The crust sets the tone for your tiramisu cheesecake. It adds texture, flavor, and balance to every bite. Picking the right crust makes a noticeable difference in how the dessert feels and tastes. Below are the three most popular crust options, each with its own strengths and challenges.
The Rich Chocolate Cookie (Oreo) Crust
This crust pairs beautifully with the coffee flavor of tiramisu. The chocolate enhances the bitterness of espresso while keeping the sweetness in check. It is simple to make and holds up well under a creamy filling. The only drawback is that it can become overly sweet if the filling is also rich in sugar.
The Buttery Vanilla Wafer Crust
Light and delicate, this crust lets the mascarpone and coffee shine. It brings a mild sweetness and a soft crunch that works well with airy no-bake versions. It is easy to prepare and press into a pan. The only trade-off is that it lacks the deep, bold flavor some people expect from a tiramisu dessert.
The Classic Ladyfinger Crust
This option stays closest to the traditional tiramisu spirit. The soft Savoiardi biscuits soak up coffee and create a lovely layered texture under the cheesecake. The challenge is that they can become soggy if soaked too long or if the filling is too wet. Quick dipping in coffee and careful layering help maintain structure.
Each crust brings a distinct personality. Choose the one that fits your taste and the version you plan to make. A chocolate crust gives intensity, a vanilla wafer crust adds balance, and a ladyfinger crust captures authenticity.
Recipe 1: Classic Baked Tiramisu Cheesecake (New York Style Creaminess)
- Prep Time: 30 minutes
- Cook Time: 80 minutes
- Chilling Time: Overnight
- Servings: 10–12 slices
Ingredients
Chocolate Crust
- 35 chocolate cream cookies (about 455 g)
- 5 tbsp unsalted butter, melted (about 85 g)
Cheesecake Filling
- 24 oz full-fat cream cheese, room temperature
- 8 oz mascarpone cheese, room temperature
- 1½ cups granulated sugar (about 325 g)
- ½ tsp salt
- 1 tsp vanilla extract
- 4 large eggs, room temperature
- ½ cup heavy cream (about 120 g)
- 1 cup sour cream (about 240 g)
- 1 tbsp cornstarch, sifted
Assembly
- 12 ladyfinger biscuits
- ½ cup strong coffee, cooled
Coffee Mascarpone Cream
- 4 oz mascarpone cheese, cold
- 2–4 tbsp granulated sugar
- 1 tsp instant coffee mixed with 1 tsp water
- 1 cup heavy whipping cream, chilled
Decoration
- 2 tbsp cocoa powder for dusting
Recipe Note: We use a 10-inch pan for this baked version to accommodate the ladyfinger layer without risking overflow, resulting in a classic, substantial cheesecake.
Instructions
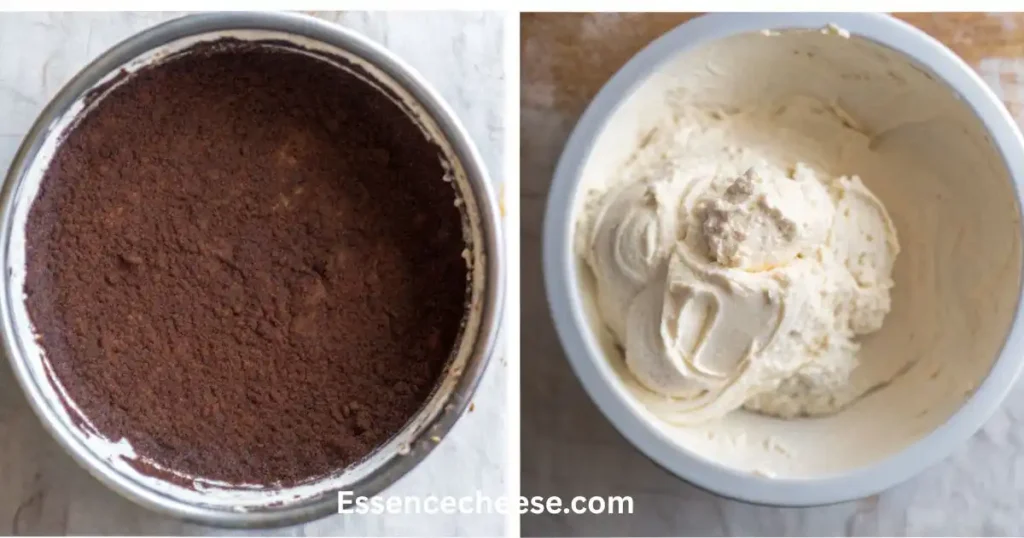
Prepare the Crust
- Preheat oven to 350°F (175°C) and butter the bottom of a 10-inch springform pan.
- Crush chocolate cookies and combine with melted butter until the texture resembles wet sand.
- Press the mixture firmly into the pan base and bake for 7–8 minutes. Set aside to cool.

Make the Cheesecake Filling
4. Reduce oven temperature to 320°F (160°C).
Pro-Tip: Let all your dairy ingredients come fully to room temperature. Soft cream cheese blends smoothly and creates a perfectly creamy batter.
5. Beat cream cheese, mascarpone, sugar, vanilla, and salt on medium-low speed until smooth. Scrape the bowl often.
6. Add lightly whisked eggs slowly, mixing on low speed until just combined.
Pro-Tip: Mix gently when adding eggs. Overmixing whips air into the batter, which can cause cracks during baking.
7. Stir in heavy cream, sour cream, and sifted cornstarch. Mix only until smooth.

Assemble and Bake
8. Wrap the outside of the pan with aluminum foil to prevent leaks.
9. Pour half of the batter into the crust and smooth the top. Tap gently to release air bubbles.
Pro-Tip: To avoid leaks, wrap the outside of the pan with two layers of foil. This keeps water out of your crust during baking.
10. Dip each ladyfinger briefly into coffee and arrange them in a single layer over the filling.
11. Pour the remaining batter on top and smooth evenly.
12. Place the pan in a large roasting dish and add hot water until halfway up the sides.
13. Bake for about 80 minutes until the edges are set and the center jiggles slightly.
Pro-Tip: For a stress-free water-bath alternative, place a small pan of hot water on the lower oven rack. It adds moisture without touching your cheesecake.
14. Turn off the oven, crack the door open, and cool inside for 15 minutes.
15. Remove, let rest at room temperature for 2 hours, run a knife around the edges, and refrigerate overnight.
Pro-Tip: Cool the cheesecake gradually. Sudden temperature changes can make the top crack. Leave the oven door slightly open for 15 minutes before removing.
Prepare the Coffee Mascarpone Cream
16. Whisk mascarpone, sugar, and coffee until creamy.
17. Add chilled heavy cream and beat until stiff peaks form.
Decorate and Serve
18. Spread a thin layer of cream on top, pipe the rest decoratively, and dust with cocoa powder.

Classic Baked Tiramisu Cheesecake (New York Style Creaminess)
Ingredients
Chocolate Crust
- 35 cookies chocolate cream cookies
- 5 tbsp unsalted butter, melted
Cheesecake Filling
- 24 oz full-fat cream cheese, room temperature
- 8 oz mascarpone cheese, room temperature
- 1.5 cups granulated sugar
- 0.5 tsp salt
- 1 tsp vanilla extract
- 4 large eggs, room temperature
- 0.5 cup heavy cream
- 1 cup sour cream
- 1 tbsp cornstarch, sifted
Assembly
- 12 pieces ladyfinger biscuits
- 0.5 cup strong coffee, cooled
Coffee Mascarpone Cream
- 4 oz mascarpone cheese, cold
- 2-4 tbsp granulated sugar
- 1 tsp instant coffee mixed with 1 tsp water
- 1 cup heavy whipping cream, chilled
Decoration
- 2 tbsp cocoa powder for dusting
Instructions
- Preheat oven to 175°C (350°F). Butter the bottom of a 10-inch springform pan.
- Crush chocolate cookies and mix with melted butter until the texture resembles wet sand. Press into pan and bake 7–8 minutes. Cool.
- Reduce oven temperature to 160°C (320°F). Beat cream cheese, mascarpone, sugar, vanilla, and salt until smooth.
- Add eggs one at a time on low speed until just combined. Stir in heavy cream, sour cream, and cornstarch.
- Wrap the pan with foil. Pour half the batter into the crust, tap to remove bubbles, then layer with coffee-dipped ladyfingers. Pour the remaining batter on top.
- Place in a roasting pan with hot water halfway up the sides. Bake for 80 minutes until edges are set and center jiggles slightly.
- Turn off the oven, crack the door open, and cool inside for 15 minutes. Let rest at room temperature for 2 hours, then refrigerate overnight.
- Whisk mascarpone, sugar, and coffee until creamy. Add heavy cream and beat to stiff peaks. Spread or pipe over cooled cheesecake and dust with cocoa powder.
Notes
Recipe 2: Easy No-Bake Tiramisu Cheesecake (Light, Airy and Quick)
- Prep Time: 30 minutes
- Chilling Time: 12 hours or overnight
- Servings: 8–10 slices
Ingredients
Cookie Base
- 1½ cups chocolate cookie crumbs
- ¼ cup unsalted butter, melted
Middle Layer
- ¼–½ cup strong coffee (regular or decaf)
- 8–10 ladyfingers
Tiramisu Filling
- 10½ oz cream cheese, room temperature
- 1 cup mascarpone cheese, room temperature
- 1¼ cups powdered sugar, sifted
- 1 tsp vanilla extrac
- 1 cup cold heavy or whipping cream, divide
- 1 tbsp powdered gelatin (about 15 ml)
Recipe Note: An 8-inch pan gives this lighter, no-bake cheesecake impressive height and structure.
Instructions
Prepare the Base
- Combine cookie crumbs and melted butter.
- Press into the base of a lightly greased 8-inch springform pan.
- Chill for 20 minutes until firm.
Make the Filling
4. Beat cream cheese and mascarpone together until smooth and fluffy.
5. Add powdered sugar and vanilla, mixing until creamy.
6. Whip the cold heavy cream in a separate bowl until soft peaks form.
7. Fold whipped cream gently into the cheese mixture until smooth.
Dissolve the Gelatin
8. Mix gelatin with ¼ cup heavy cream and let it sit for 5 minutes.
Pro-Tip: Warm gelatin slowly until it dissolves completely. Boiling destroys its setting power, leaving your cheesecake too soft.
9. Warm the mixture gently over low heat until dissolved (do not boil).
10. Stir in one tablespoon of filling to temper, then add it back to the main bowl and mix gently.
Pro-Tip: Always temper the gelatin with a spoonful of the filling before adding it in. This keeps the texture silky and lump-free.

Assemble the Cheesecake
11. Spread one-third of the filling over the chilled crust.
12. Dip ladyfingers quickly into coffee and arrange them in a single layer.
13. Add another layer of filling, smooth it, then top with the remaining filling.
Pro-Tip: For the smoothest top, use an offset spatula dipped in warm water to level the final layer.
Chill and Finish
14. Refrigerate for at least 12 hours or overnight.
15. Dust generously with unsweetened cocoa powder before serving.
Pro-Tip: Let it chill for at least 12 hours. Patience gives the cheesecake time to firm up and lets the coffee flavor bloom.

Easy No-Bake Tiramisu Cheesecake
Ingredients
Cookie Base
- 1 1/2 cups chocolate cookie crumbs
- 1/4 cup unsalted butter, melted
Middle Layer
- 1/2 cup strong coffee (regular or decaf)
- 10 ladyfingers
Tiramisu Filling
- 10.5 oz cream cheese, room temperature
- 1 cup mascarpone cheese, room temperature
- 1 1/4 cups powdered sugar, sifted
- 1 tsp vanilla extract
- 1 cup cold heavy or whipping cream, divided
- 1 tbsp powdered gelatin about 15 ml
- unsweetened cocoa powder, for dusting to finish
Instructions
- Prepare the Base: Combine the cookie crumbs and melted butter. Press firmly into the base of a lightly greased 8-inch springform pan. Chill for 20 minutes until firm.
- Make the Filling: Beat cream cheese and mascarpone together until smooth and fluffy. Add powdered sugar and vanilla, mixing until creamy.
- Whip the cold heavy cream in a separate bowl until soft peaks form. Fold whipped cream gently into the cheese mixture until smooth.
- Dissolve the Gelatin: Mix gelatin with ¼ cup of heavy cream and let sit for 5 minutes. Warm gently over low heat until dissolved (do not boil). Stir in one tablespoon of filling to temper, then add back to the main bowl and mix gently.
- Assemble the Cheesecake: Spread one-third of the filling over the chilled crust. Dip ladyfingers quickly into coffee and arrange in a single layer. Add another layer of filling, smooth it, then top with the remaining filling.
- Chill and Finish: Refrigerate for at least 12 hours or overnight. Dust generously with unsweetened cocoa powder before serving.
Notes
The Baker’s Handbook: Pro Tips and Troubleshooting FAQ
Pro Tips for Success
Tip 1: Use Room Temperature Ingredients for Baked Cheesecake
Cold cream cheese and eggs prevent smooth mixing and can trap lumps in the batter. Let all ingredients reach room temperature before combining. This ensures the batter blends evenly, producing a silky texture with no clumps.
Tip 2: Avoid Overmixing the Batter
Overmixing adds too much air, which expands during baking and collapses during cooling, creating cracks. Mix on low speed and stop as soon as the ingredients are fully combined.
Tip 3: Dip Ladyfingers Quickly to Prevent Sogginess
Ladyfingers are delicate and soak up liquid instantly. Dip them for just one second per side to coat lightly. Over-soaking causes the base layer to disintegrate during chilling or baking.
Troubleshooting the Baked Cheesecake
Why did my cheesecake crack?
Cracks form when the batter has too much air or the cheesecake experiences a rapid temperature change. Overmixing creates air pockets that expand during baking, then collapse as the cheesecake cools. Cooling too quickly worsens this effect.
How to fix it: Mix on low speed, avoid whisking air into the batter, and use a gentle cooling process. Once baked, turn off the oven, crack the door slightly, and let the cheesecake rest inside for 15–20 minutes before removing it. This prevents sudden contraction of the top surface.
Pro-Tip: Even professionals see cracks sometimes. A swirl of mascarpone cream or cocoa dust hides them beautifully.
How can I fix a cracked cheesecake?
Even with careful preparation, cracks can happen. Don’t worry—texture matters more than appearance.
How to fix it: Once the cheesecake cools, spread a layer of coffee mascarpone cream or whipped topping over the surface. You can also decorate with cocoa powder or piped cream rosettes to disguise the crack elegantly.
My crust turned out soggy. What happened?
A soggy crust usually means moisture from the water bath seeped through the foil into the pan. It can also result from overbaking the crust before adding the filling, which causes butter to separate and lose structure.
How to fix it: Always wrap your springform pan tightly in several layers of heavy-duty foil, ensuring no gaps. If you prefer to skip the foil, place the pan inside a larger roasting dish without water and add a separate pan of hot water on the rack below to create steam without direct contact.
Pro-Tip: If water-bath leaks worry you, bake the cheesecake on a rack with a separate pan of hot water below for gentle steam.
Troubleshooting the No-Bake Cheesecake
Why isn’t my no-bake cheesecake setting?
The most common cause is under-activated gelatin or insufficient chilling time. Gelatin needs to dissolve completely to set the filling. If it’s overheated or not mixed evenly, the structure weakens.
How to fix it: Warm the gelatin gently until melted, but never let it boil. After dissolving, add a spoonful of filling to the gelatin to equalize the temperature (tempering) before mixing it into the main bowl. Let the cheesecake chill for at least 12 hours for the best texture.
Pro-Tip: Chill longer rather than adding extra gelatin immediately. Time often fixes a soft center.
How can I make my cheesecake firmer?
A soft or loose texture often means the mixture contains too much moisture or air.
How to fix it: Use full-fat cream cheese and mascarpone, since low-fat versions have more water and can prevent proper setting. Whip your heavy cream until stiff peaks form before folding it in. Avoid shortening the chilling period—this is when the gelatin stabilizes the structure.
Common Questions
Can I make this without alcohol?
Yes. You can create a flavorful non-alcoholic syrup by mixing half a cup of strong brewed coffee with a teaspoon of brown sugar and a small splash of vanilla. Boil gently for two minutes and cool before using. This gives the same rich depth that Kahlua provides without any alcohol.
What is the best substitute for Kahlua?
If you prefer a similar flavor profile, mix espresso with a little cocoa powder and sugar. Alternatively, use cold brew coffee concentrate with a teaspoon of caramel syrup for a smoother, less bitter version.
Can I use different cookies for the crust?
Absolutely. The crust can transform the dessert’s personality.
For a mild flavor, use graham crackers or digestive biscuits.
For a rich coffee match, use chocolate cookies.
For a classic tiramisu feel, go with ladyfingers.
Each crust alters the texture and sweetness, so choose based on your filling’s richness.
Pro-Tip: Try small test crusts in ramekins with your chosen cookie to preview flavor and texture before committing to the full cake.
Storing and Freezing Your Masterpiece
A tiramisu cheesecake tastes even better the next day, once the flavors have blended and the texture has firmed up. Knowing how to store and freeze it correctly helps you keep that perfect taste and texture for longer.
How to Store Leftover Tiramisu Cheesecake
Keep any leftover cheesecake covered tightly in the refrigerator. Use plastic wrap or a sealed container to prevent it from drying out or absorbing odors. It can stay fresh for up to five days when properly covered. If you have piped mascarpone cream on top, avoid stacking anything over it to keep the design intact. Before serving again, let the cheesecake sit at room temperature for about ten minutes for the best flavor.
Freezing for Later: A Step-by-Step Guide
If you want to save your cheesecake for another day, freezing works very well. Chill the cheesecake completely in the refrigerator first. Once it is firm, remove it from the pan and place it on a flat surface lined with parchment paper. Freeze it uncovered for about one hour until the surface hardens slightly. Then wrap it tightly in plastic wrap and a layer of foil to prevent freezer burn.
You can freeze the entire cheesecake or individual slices. Label the package with the date so you know how long it has been stored. It will keep well in the freezer for up to two months.
To thaw, transfer the cheesecake to the refrigerator and let it defrost slowly overnight. Avoid thawing at room temperature to prevent condensation from softening the crust. Dust with fresh cocoa powder before serving for the perfect finish.
Proper storage and freezing not only save time but also preserve that rich, creamy texture and balanced flavor that make tiramisu cheesecake unforgettable.
Conclusion
You now have everything you need to create the ultimate tiramisu cheesecake. Whether you chose the rich and indulgent baked version or the light and effortless no-bake one, you’re equipped with the crust guide, troubleshooting tips, and pro-secrets to bake (or chill) with total confidence. The first slice always feels like magic—take a moment to enjoy it, you earned it!
Your feedback is what keeps this community alive!
If you make this tiramisu cheesecake, please leave a star rating and a comment below. I’d love to know which version you chose and how it turned out.
Tag your creations on Instagram with @essencecheese1 and #essencecheese so I can share your masterpieces with our dessert-loving community!
Have you given our recipe a try ?
There are no reviews yet. Be the first one to write one.
Last Updated on October 27, 2025 by Janelle
