
The Best Pistachio Cheesecake Recipe (Creamy, Easy, and Absolutely Worth It)
Why This Recipe Works
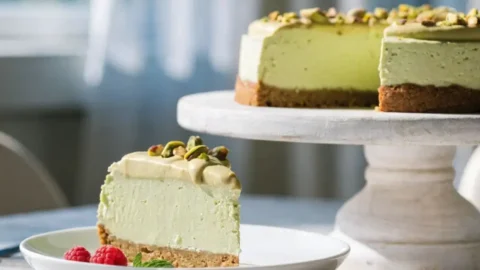
There’s something about pistachio cheesecake that feels a little special. The flavor is rich and nutty, the color is that beautiful natural green, and when you set a slice down in front of someone who’s never tried it before, they always do a little double-take. It looks impressive. It tastes even better. And the best part? It’s genuinely not that hard to make.
This recipe walks you through everything from scratch: the buttery biscuit crust, the creamy pistachio filling, and a simple topping to finish it off. We’ll show you how to master the perfect water bath for a flawless, crack-free surface, ensure an ultra-creamy, melt-in-your-mouth texture, and achieve that deep, authentic pistachio flavor in every bite.
Table of Contents
A Treat for Any Occasion
Whether this is your first cheesecake or your fiftieth, this guide has you covered. It’s an ideal dessert for special occasions, holiday gatherings, or simply when you want to impress with minimal stress. With clear, expert tips and a comprehensive troubleshooting guide, you’ll be baking like a pro in no time. For those who’d rather skip the oven entirely, we’ve also included a complete no-bake version at the end, offering a lighter, mousse-like alternative that’s just as delicious. Get ready to fall in love with your new favorite cheesecake!
Before You Start: A Few Things That Actually Matter
Most cheesecake failures come down to a handful of simple mistakes, and almost all of them happen before anything goes near the oven. Getting these right costs you nothing except a bit of patience.
Use full-fat everything: Full-fat cream cheese, full-fat sour cream, full-fat everything. Low-fat versions have more water and additives that mess with the texture. This is one recipe where the full-fat version genuinely makes a difference you’ll taste.
Let your dairy come to room temperature: Take your cream cheese, sour cream, and eggs out of the fridge at least one to two hours before you start. Cold cream cheese doesn’t mix smoothly; it stays lumpy no matter how long you beat it, and those lumps don’t disappear in the oven. Room-temperature ingredients blend into a silky, smooth batter without any effort.
Mix slowly: A cheesecake batter should be smooth, not fluffy. When you mix at high speed, you whip air into the batter. That air expands in the oven and then collapses as the cheesecake cools. And that’s what causes cracks. Keep your mixer on the lowest setting the whole time.
Don’t rush the cooling: A cheesecake that’s cut too soon will be soft, slumpy, and a bit sad. Give it the full overnight rest in the fridge, and you’ll be rewarded with clean, perfect slices.
Understanding Your Pistachio Ingredient
Walk into any supermarket or specialty food shop, and you’ll find pistachio products in a few different forms. Knowing which one to use matters.
Pistachio paste is made from 100% ground pistachios, nothing else. It’s thick, dense, deep green, and has an intense, slightly bitter, roasted nut flavor. This is what you want for the baked filling. It blends beautifully into the cream cheese batter and gives a strong, authentic pistachio flavor.
Pistachio butter is very similar to pistachio paste, also just ground pistachios, usually with no additives. You can use it exactly the same way. Think of it like peanut butter but made from pistachios.
Pistachio cream (sometimes called pistachio spread) is the sweetened version; it has added sugar, oil, and sometimes milk powder. It’s delicious, but it’s designed for spreading and topping, not for mixing into a baked filling. If you use it in the filling, the cheesecake will end up too sweet, and the texture will be off. Save it for the topping, where it works wonderfully.
If you can’t find pistachio paste at your local shop, Middle Eastern grocery stores usually stock it. You can also find good options online. In a pinch, you can make your own by blending roasted, shelled pistachios in a food processor for 10–15 minutes until completely smooth; just be patient with it.
What You’ll Need
(Note: Gram measurements are recommended for accuracy. US customary conversions are approximate.)
For the biscuit crust
- 200g (about 7 oz or 1 ½ cups) digestive biscuits (or graham crackers if you’re in the US)
- 50g (about ½ cup) pistachios, shelled
- 75g (5 tablespoons) unsalted butter, melted
- 15g (1 tablespoon + 1 teaspoon) caster sugar
- A pinch of fine salt
For the cheesecake filling
- 800g (four 8-oz blocks) full-fat cream cheese, at room temperature
- 150g (¾ cup) caster sugar
- 200g (about ¾ cup) pistachio paste or pistachio butter (pure, with no added sugar)
- 200g (¾ cup + 1 tablespoon) full-fat sour cream, at room temperature
- 1½ tablespoons cornstarch
- ¼ teaspoon almond extract
- 2½ teaspoons vanilla extract
- 4 large eggs, at room temperature
For the topping
- 85g (3 oz or about ½ cup) white chocolate, finely chopped
- 100g (scant ½ cup) heavy cream, for heating
- 100g (scant ½ cup) heavy cream, cold
- ¼ teaspoon vanilla extract
- A handful of pistachios, roughly chopped, to finish
Equipment
- 23cm (9-inch) springform tin
- Food processor or a zip-lock bag and rolling pin
- Electric hand mixer or stand mixer
- A large roasting pan (for the water bath)
- Parchment paper
How to Make It: Step by Step
Step 1: Get your ingredients ready
Take the cream cheese, sour cream, and eggs out of the fridge. Set them on the counter and leave them for at least an hour; two hours is even better. This is the most important step, and it costs you nothing but time. Line the bottom of your springform tin with a circle of parchment paper. Grease the sides lightly with a little butter.
Step 2: Make the crust
Preheat your oven to 160°C (325°F), conventional setting, not fan. Put the digestive biscuits and pistachios into a food processor and blitz until they look like coarse, sandy crumbs. You want some texture from the pistachios; don’t grind them too fine. If you don’t have a food processor, put everything in a zip-lock bag and crush with a rolling pin.
Tip the crumbs into a bowl and pour in the melted butter, sugar, and salt. Stir until the mixture looks like damp sand and holds together when you squeeze a bit between your fingers.
Tip the mixture into your prepared tin. Use the flat bottom of a glass or measuring cup to press it firmly and evenly across the bottom and about 2–3cm up the sides. The more firmly you pack it, the better it will hold once sliced. Bake for 10 minutes, then take it out and set it aside to cool. Leave the oven on.
Step 3: Make the filling
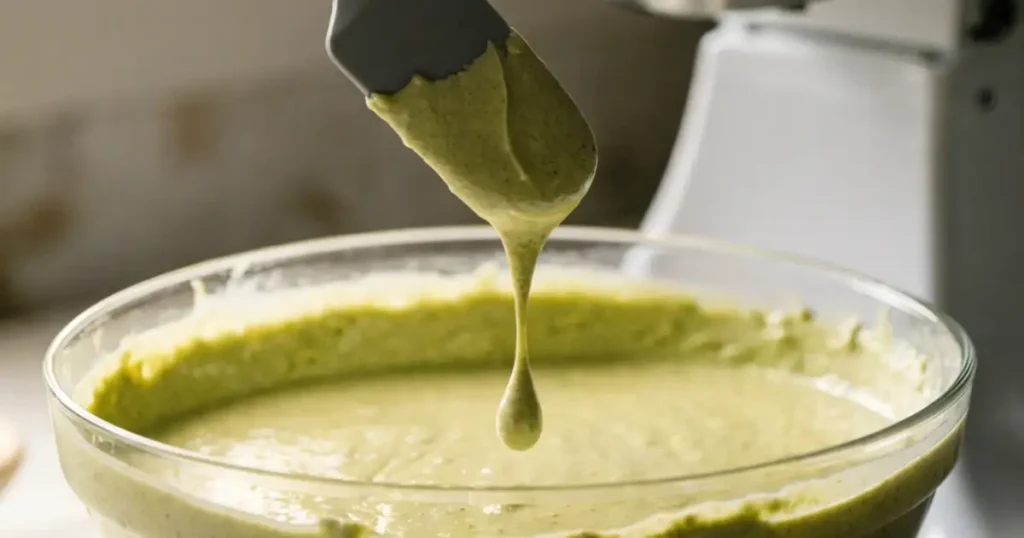
In a large bowl, beat the cream cheese with an electric mixer on the lowest speed for about a minute, just until it’s smooth and creamy. Don’t rush this; any lumps here will stay lumps. Add the caster sugar and the pistachio paste. Mix on low for another minute until everything is fully combined. The batter will start to turn a lovely muted green at this stage.
In a small bowl, stir together the sour cream and cornstarch until you can’t see any cornstarch lumps. Add this to the cream cheese mixture along with the almond extract and vanilla extract. Mix on low until just combined.
Now add the eggs, two at a time. After each addition, mix on low speed just until the eggs disappear into the batter; don’t overmix. Once all the eggs are in, stop the mixer. Use a spatula to scrape down the sides of the bowl and give the batter one gentle fold to make sure everything is combined. The batter should be smooth, slightly thick, and a beautiful soft green color. Resist the urge to taste too much of it; you’ll want to save it for the actual cheesecake.
Step 4: Set up the water bath
A water bath sounds complicated, but it’s really just a way of making sure the cheesecake bakes gently and evenly. It’s the secret to a creamy texture and a crack-free surface. Here’s the easy method: place your springform tin inside a slightly larger cake tin or pan (about 25cm / 10-inch). Then place that inside your largest roasting pan. This way, water can’t seep through the bottom of the springform and make the crust soggy.
Pour the cheesecake batter over the cooled crust and smooth the top with a spatula. Boil a full kettle of water. Slide the roasting pan into the oven, then pour the boiling water into the roasting pan until it comes about two-thirds of the way up the side of the inner cake pan. Pouring the water while the pan is already in the oven means less risk of spilling.
Step 5: Bake it
Bake for 70 to 75 minutes. When it’s done, the outer edges of the cheesecake should look fully set and slightly puffed. The center, roughly the inner third of the surface, should still have a slow, gentle wobble when you shake the pan. It should look like a set jelly that’s been nudged, not like liquid sloshing around. If the whole surface is still wobbly and liquidy, give it another 5 minutes and check again.
Step 6: Cool it slowly
This step is just as important as the baking itself. Turn the oven off. Prop the oven door open about 5cm; rest a wooden spoon in the gap to hold it. Leave the cheesecake in the oven exactly like this for one full hour. Don’t open the door wide; don’t take it out early. The slow, gradual drop in temperature is what keeps the surface smooth.
After an hour, take the cheesecake out and remove it from the water bath. Leave it on the counter for another 30 minutes, then transfer it to the fridge. Leave it uncovered for the first half hour, then cover it loosely with foil. Let it rest overnight, or at minimum six hours.
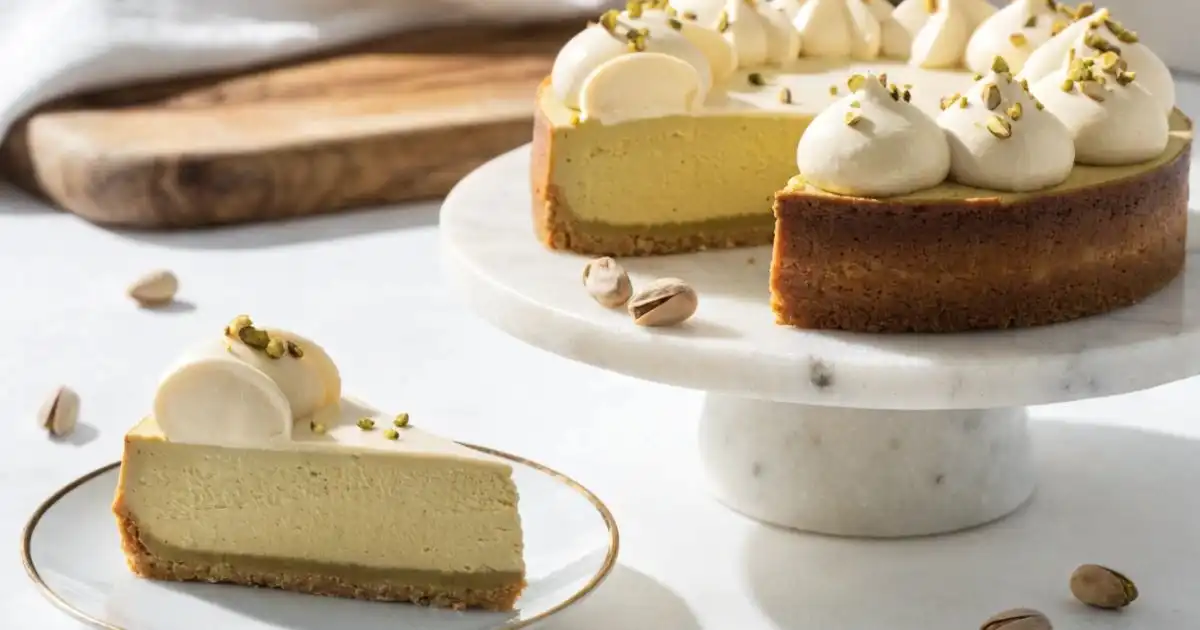
Step 7: Make the white chocolate topping
While the cheesecake bakes, you can make the topping. This can also be done the night before, which makes life easier. Put the chopped white chocolate in a heatproof bowl. Heat 100g of the heavy cream in a small saucepan over medium heat until it just begins to bubble around the edges. Pour it over the chocolate in three additions, stirring gently after each one until the chocolate is fully melted and the mixture is smooth. Stir in the vanilla extract. Then pour in the remaining 100g of cold heavy cream and stir to combine. Press a piece of plastic wrap directly against the surface (this stops a skin from forming) and put it in the fridge overnight.
When you’re ready to serve, take the ganache out of the fridge and whip it with a hand mixer until it reaches soft, pillowy peaks, like a thick whipped cream. Spread or dollop it over the chilled cheesecake.
Step 8: Finish and serve
Scatter the roughly chopped pistachios over the top. Slice with a sharp knife, wiping it clean between each cut for the neatest slices. Serve cold.
Troubleshooting: What Went Wrong?
My cheesecake cracked. Most likely cause: the cream cheese was too cold, the eggs were mixed in too fast, or it cooled too quickly. The slow oven-door cooling step at the end is often the one people skip.
The center is soft and wobbly even after chilling overnight. It may have been slightly underbaked. This can happen if your oven runs cool. For next time, use an oven thermometer; many home ovens are 10–15 degrees off from what they display. The cheesecake is still usually safe to eat; the texture will just be softer than ideal.
The crust is soggy. Water seeped through the springform during the water bath. Next time, use the double-pan method described above rather than wrapping foil around the tin. Foil can leak.
The flavor is too mild. The pistachio paste you used may have been quite mild. Try adding ¼ teaspoon more almond extract next time; it amplifies the pistachio flavor noticeably without making the cheesecake taste like marzipan.
The Best Pistachio Cheesecake Recipe (Creamy, Easy, and Absolutely Worth It)
Equipment
- 23cm (9-inch) springform tin
- Food processor
- electric hand mixer or stand mixer
- Large roasting pan
- Parchment paper
- Mixing bowls
- Spatula
Ingredients
For the Biscuit Crust
- 200 g digestive biscuits or graham crackers
- 50 g shelled pistachios
- 75 g unsalted butter, melted
- 15 g caster sugar
- 1 pinch fine salt
For the Cheesecake Filling
- 800 g full-fat cream cheese, room temperature
- 150 g caster sugar
- 200 g pistachio paste or pistachio butter unsweetened
- 200 g full-fat sour cream, room temperature
- 1.5 tbsp cornstarch
- 0.25 tsp almond extract
- 2.5 tsp vanilla extract
- 4 large eggs, room temperature
For the Topping
- 85 g white chocolate, finely chopped
- 100 g heavy cream, for heating
- 100 g heavy cream, cold
- 0.25 tsp vanilla extract
- 50 g roughly chopped pistachios for garnish
Instructions
- Remove the cream cheese, sour cream, and eggs from the refrigerator and allow them to come to room temperature for 1–2 hours. Line the base of a 23cm springform pan with parchment paper and lightly grease the sides.
- Preheat the oven to 160°C (325°F). Pulse the biscuits and pistachios in a food processor until they resemble coarse crumbs. Mix with melted butter, sugar, and salt until evenly combined.
- Press the crust mixture firmly into the bottom and slightly up the sides of the prepared pan. Bake for 10 minutes, then cool while keeping the oven on.
- Beat the cream cheese on low speed until smooth. Add the sugar and pistachio paste and mix until fully incorporated.
- Combine the sour cream and cornstarch in a small bowl until smooth. Add to the cream cheese mixture along with the almond extract and vanilla extract. Mix on low speed until combined.
- Add the eggs two at a time, mixing gently after each addition just until incorporated. Scrape down the bowl and fold once with a spatula.
- Place the springform pan inside a slightly larger cake pan, then place both inside a roasting pan. Pour the filling over the crust and smooth the surface.
- Fill the roasting pan with boiling water until it reaches about two-thirds up the side of the inner pan, creating a water bath.
- Bake for 70–75 minutes, until the edges are set and the center still has a gentle wobble.
- Turn off the oven and prop the door open slightly. Leave the cheesecake inside for 1 hour. Remove from the water bath and cool on the counter for 30 minutes.
- Transfer the cheesecake to the refrigerator and chill for at least 6 hours, preferably overnight.
- To make the topping, place the chopped white chocolate in a heatproof bowl. Heat 100g heavy cream until steaming and pour over the chocolate in three additions, stirring until smooth.
- Stir in the vanilla extract and the remaining cold heavy cream. Cover the surface and refrigerate overnight or until thoroughly chilled.
- Whip the chilled ganache until soft peaks form. Spread or dollop over the chilled cheesecake.
- Garnish with chopped pistachios. Slice with a clean sharp knife and serve cold.
Notes
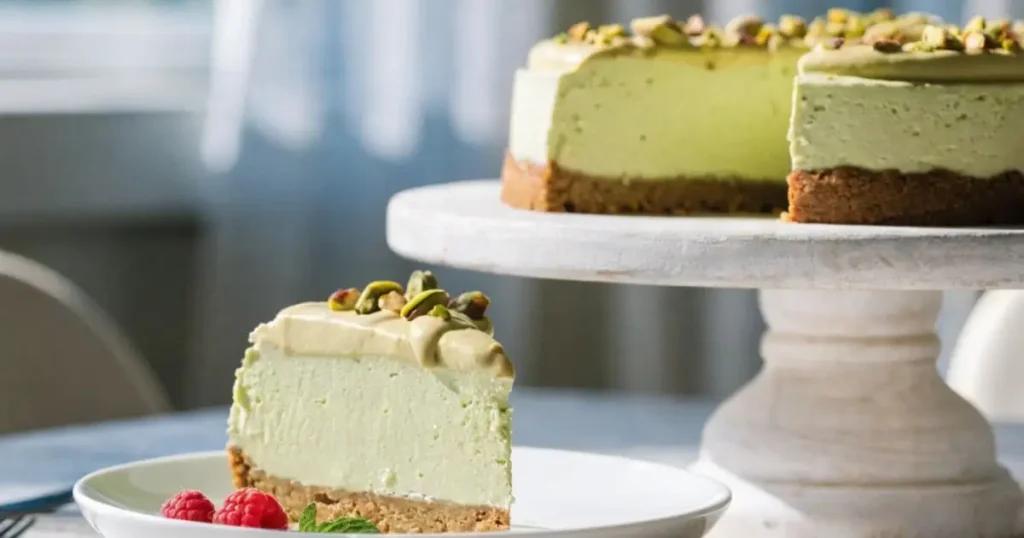
No-Bake Version: Just as Good, No Oven Required
If you’d rather not deal with a water bath, this no-bake version is wonderful. The texture is lighter, more like a mousse, and it takes about 20 minutes of active work before the fridge does the rest.
What you need
Crust:
- 300g (about 10.5 oz or 2 ¼ cups) digestive biscuits
- 100g (about 1 cup) pistachios
- 135g (9 tablespoons) unsalted butter, melted
Filling:
- 600g (three 8-oz blocks) full-fat cream cheese, at room temperature
- 300g (about 1 cup + 2 tablespoons) pistachio cream (the sweet spread version works here)
- 125g (1 cup) icing sugar, sifted
- 300ml (1 ¼ cups) double cream (must be full-fat; anything with less than 35% fat won’t set)
Topping:
- 125g (about ½ cup) pistachio cream, slightly warmed
- A handful of chopped pistachios
How to make it
Make the crust the same way as the baked version, but don’t bake it; just press it into the tin and put it in the fridge for 30 minutes to firm up.
For the filling, beat the cream cheese, pistachio cream, and icing sugar together until completely smooth. Add the double cream and keep beating until the mixture is very thick; it should hold its shape when you lift the beaters and not slide off the spoon without a little shake. This usually takes 2–3 minutes.
Spoon the filling over the chilled crust and smooth the top. Refrigerate for at least 6 hours, ideally overnight.
To serve, unmould the cheesecake carefully onto a serving plate. Warm the pistachio cream in the microwave for about 20 seconds until pourable, then drizzle or spread it over the top. Scatter with chopped pistachios and serve.
No-Bake Pistachio Cheesecake
Equipment
- 23cm (9-inch) springform tin
- Food processor
- electric hand mixer or stand mixer
- Mixing bowls
- Spatula
Ingredients
For the Crust
- 300 g digestive biscuits
- 100 g shelled pistachios
- 135 g unsalted butter, melted
For the Filling
- 600 g full-fat cream cheese, room temperature
- 300 g pistachio cream sweetened pistachio spread
- 125 g icing sugar, sifted
- 300 ml double cream minimum 35% fat
For the Topping
- 125 g pistachio cream, slightly warmed
- 50 g chopped pistachios for garnish
Instructions
- Line the base of a 23cm (9-inch) springform pan with parchment paper.
- Place the digestive biscuits and pistachios into a food processor and pulse until fine crumbs form.
- Add the melted butter and mix until the crumbs resemble wet sand.
- Press the mixture firmly into the base and slightly up the sides of the prepared pan. Refrigerate for 30 minutes until firm.
- In a large mixing bowl, beat the cream cheese, pistachio cream, and sifted icing sugar until completely smooth.
- Add the double cream and continue beating for 2–3 minutes until the filling becomes very thick and holds its shape.
- Spoon the filling onto the chilled crust and smooth the top with a spatula.
- Refrigerate for at least 6 hours, preferably overnight, until fully set.
- Carefully remove the cheesecake from the pan and transfer to a serving plate.
- Warm the pistachio cream for about 20 seconds until pourable, then drizzle or spread it over the cheesecake.
- Finish with chopped pistachios and serve chilled.
Notes
How to Store It
Keep the cheesecake in the fridge, covered, for up to 3 days. It actually tastes better on day two once it’s had more time to set and the flavors have deepened.
To freeze: once the cheesecake has fully set in the fridge (at least 8 hours), you can freeze it without the topping. Wrap it tightly in two layers of plastic wrap and freeze for up to 2 months. Defrost it overnight in the fridge, not at room temperature, and add the topping fresh when you’re ready to serve.
Frequently Asked Questions
Can I use pistachio cream in the baked filling instead of pistachio paste?
It’s not recommended. Pistachio cream has added sugar and oil that throw off the balance of the baked filling; it ends up too sweet, and the texture can become greasy. Stick to pure pistachio paste for the baked version. The no-bake filling, on the other hand, works well with pistachio cream.
Do I really need a water bath?
For the baked version, yes. Without it, the heat is uneven, the edges overcook before the center is done, and the surface almost always cracks. It takes an extra 5 minutes to set up and makes a real difference.
My cheesecake looks done, but the center is still wobbly; is that normal?
Yes, completely normal and actually what you want. The center will continue setting as the cheesecake cools in the oven and then chills in the fridge. If you bake until the center is completely firm, you’ll end up with an overcooked, dense cheesecake. Trust the wobble.
Can I make this ahead of time?
Absolutely, and it’s actually better if you do. The cheesecake improves after a full overnight rest. You can make it up to 3 days in advance and keep it refrigerated. Add the topping on the day you plan to serve it.
What can I use instead of sour cream?
Full-fat Greek yogurt works as a direct substitute in the same quantity. The flavor is very slightly tangier, but the texture is almost identical.
Last Updated on June 6, 2026 by Janelle
