
The Complete Guide to Biscoff Cheesecake: Classic Baked & Easy No-Bake Methods
There are desserts that are pleasant, and there are desserts that stop conversation at the table. A properly made Biscoff cheesecake lands firmly in the second category, the caramel-spiced depth of Lotus Biscoff biscuits meeting the cool, dense richness of a classical cheesecake filling. This guide covers both a premium baked method and a quick, egg-free no-bake method in full technical detail, so you can choose the path that fits your schedule and skill level without compromising on the result.
Table of Contents
What Is Biscoff? Understanding the Flavor Foundation
Biscoff is the brand name used by the Belgian company Lotus for their Speculoos cookies, a caramelized spiced shortcrust biscuit with a distinctive flavor profile built on brown sugar, cinnamon, and a gentle blend of warming spices. The term speculoos refers to the broader category of spiced shortcrust biscuits traditional to Belgium and the Netherlands; Lotus simply became the dominant commercial expression of that tradition.
What makes the speculoos flavor so effective in a cheesecake context is contrast. The cookies and the cookie butter spread derived from them bring a toasted, almost butterscotch-adjacent sweetness that cuts cleanly through the tang of a cream cheese filling. The result is more complex than a standard graham cracker cheesecake, richer on the palate, but never cloying when properly balanced.
The easy no-bake Biscoff cheesecake variation covered later in this guide requires no oven time and is entirely egg-free, making it accessible for warmer months or beginner bakers. The baked version demands more patience, but rewards it with a denser, more custard-like texture that holds in the refrigerator impeccably.
Ingredient Selection: Getting the Foundation Right
The Non-Negotiable: Full-Fat Brick Cream Cheese
Cheesecake is not forgiving of ingredient substitutions at the structural level. The filling depends on the fat content and density of full-fat brick-style cream cheese to achieve its characteristic set. Low-fat versions introduce excess moisture and produce a soft, unstable filling that will not hold a clean slice. Whipped cream cheese, sold in tubs with air incorporated, behaves entirely differently under heat and should not be used in a baked cheesecake.
For the Biscoff cookie crust and batter, the fat from the cream cheese is doing two things simultaneously: it contributes to a smooth, dense texture during baking, and it emulsifies with the creamy Biscoff cookie butter to produce a unified, stable filling rather than a greasy or separated one.
The International Cream Cheese Problem, A Critical Note for UK, EU, and Australian Bakers
This is the single most common point of failure for bakers outside North America, and it is almost never addressed in recipe content.
In the United States, brick-style cream cheese (Philadelphia being the standard reference) is sold in dense, foil-wrapped blocks with a very low moisture content. In the UK, European Union countries, and Australia, cream cheese is predominantly sold in tubs with a significantly higher water content. If you substitute tub-style cream cheese on a 1:1 weight basis, the excess moisture will undermine the structure of both the baked and no-bake filling.
The correction is simple: Weigh out 900g of tub-style cream cheese and drain it through a double layer of cheesecloth (muslin) suspended over a bowl in the refrigerator for 4–8 hours, or overnight. You are targeting a drained weight of 680g, which matches the density and fat content of US brick-style cream cheese. Proceed with the recipe using the drained 680g.
Technique Note: Do not skip the draining step if you are using tub-style cream cheese. A filling made with undrained tub cream cheese may appear to set in the oven but will weep moisture during refrigeration, softening your Biscoff cookie crust from beneath and preventing the cheesecake from holding a clean slice.
Temperature Is a Technical Requirement, Not a Suggestion
Room-temperature eggs are essential in a baked cheesecake batter. Cold eggs cause the emulsified fat in the cream cheese to contract on contact, producing a lumpy, broken batter that cannot be rescued by further mixing. Pull your eggs from the refrigerator at least 45 minutes before you begin.
The same principle applies to the cream cheese itself. Cold cream cheese will not beat to a smooth consistency; it will remain in small chunks that show up as lumps or white streaks in the finished cheesecake. Room temperature throughout means 68–72°F (20–22°C).
The Classic Baked Biscoff Cheesecake: Step-by-Step
Equipment
- 9-inch (23cm) springform pan
- Stand mixer or hand mixer
- Large roasting pan (for water bath)
- Offset spatula
Ingredients
For the Crust
- 250g (approx. 30) Lotus Biscoff biscuits
- ⅓ cup (75g) unsalted butter, melted
For the Filling
- 680g full-fat brick-style cream cheese, room temperature (see international note above)
- ¾ cup (150g) granulated sugar
- ½ cup (120g) full-fat sour cream, room temperature
- ½ cup (130g) Lotus Biscoff cookie butter (creamy)
- 3 large eggs, room temperature
For the Topping
- ½ cup (130g) Lotus Biscoff cookie butter (creamy), for the drip
- 2–3 Lotus Biscoff biscuits, finely crushed, for garnish
Step 1 — Building the Biscoff Cookie Crust
Pulse 250g of Lotus Biscoff biscuits in a food processor until you reach a fine, even crumb with no large pieces remaining. Transfer to a bowl and stir in ⅓ cup (75g) of melted unsalted butter until the mixture resembles damp sand; it should hold its shape when pressed between two fingers.
Press the mixture firmly and evenly into the bottom of a 9-inch springform pan. Use the flat base of a measuring cup to compact the crumb layer; an even thickness prevents the crust from crumbling when sliced. Press the crumb approximately 1 inch up the sides if you prefer a more structural border.
Bake the crust at 350°F (175°C) for 8 minutes, until it is just set and fragrant. Remove and allow to cool completely before adding the filling. A hot crust will cause the bottom layer of the batter to begin cooking unevenly.
Step 2 — Preparing the Biscoff Cheesecake Batter
In the bowl of a stand mixer fitted with the paddle attachment (or using a hand mixer), beat the room-temperature cream cheese and sugar together on medium speed for 3 minutes, scraping down the sides of the bowl at least twice. You are looking for a completely smooth, lump-free base before introducing any other ingredients. If any lumps remain at this stage, continue beating; they will not disappear later.
Add the sour cream and creamy Biscoff cookie butter and beat on low-medium speed until just incorporated, approximately 30–45 seconds. Sour cream contributes a mild tang that balances the sweetness of the Biscoff cookie butter and improves the texture of the set custard.
Now add the room-temperature eggs, one at a time, on low speed. This is a critical technique step. Adding eggs one at a time and keeping the speed low prevents two problems: it avoids over-aeration (air bubbles expand and collapse in the oven, causing cracks) and ensures each egg is fully incorporated before the next is added, maintaining a stable emulsion.
Do not test for doneness with a toothpick. A toothpick inserted into a cheesecake will compress the structure. The correct visual cue for doneness is described in the baking step below.
Step 3 — Baking the Baked Cookie Butter Cheesecake
Pour the batter into the cooled crust and smooth the top with an offset spatula.
Bake at 325°F (167°C) for 50–60 minutes. At the end of the baking time, check for the correct visual: the outer 2 inches of the cheesecake should look fully set, matte, not shiny, and firm when the pan is nudged. The center must retain a distinct, slow wobble, resembling set gelatin rather than liquid batter. This wobble is not underbaking; it is the custard structure that will complete its set during the refrigeration phase.
The Water Bath: Two Methods
The water bath, technically a bain-marie, serves two functions in cheesecake baking. It regulates the oven temperature around the cheesecake, preventing the edges from cooking faster than the center, and it maintains a humid baking environment that keeps the surface from drying and cracking.
Method A — The Traditional Submerged Water Bath
Wrap the exterior of the springform pan in 3 layers of heavy-duty aluminum foil, pressing tightly up the sides and over the rim to seal against water ingress. Place the wrapped pan inside a large roasting pan. Pour boiling water into the roasting pan until it reaches 1 inch up the sides of the springform pan. Transfer carefully to the oven.
Note: The triple-layer foil wrap is not excessive. A single layer or standard foil often admits water, particularly at the seam of the springform. Even a small amount of water soaking into the crust makes it unpleasantly soggy.
Method B — The Steam Alternative (No Leak Risk)
If you prefer to avoid the risk of water infiltrating the crust entirely, place a separate deep baking pan or oven-safe dish filled with 1 inch of boiling water on the oven rack directly beneath the cheesecake. The cheesecake sits on its own rack above, never in contact with water.
This method generates sufficient steam to maintain oven humidity without any contact between the water and the pan. It is slightly less precise than the full submersion method but eliminates the soggy-crust risk for bakers using older or less well-sealed springform pans.
Method Comparison:
- Submerged bath: More precise temperature regulation; requires careful foil sealing.
- Steam tray method: No water contact with the pan; marginally less humidity but safer for most home setups.
The Cool-Down Phase: The Most Important Step You Cannot Rush
Preventing cracks in a baked Biscoff cheesecake is not primarily about the oven; it is about the cool-down.
When the baking time is complete, turn off the oven and leave the oven door slightly ajar, propped open approximately 2 inches with a wooden spoon. Leave the cheesecake inside for 1 full hour. This gradual temperature reduction prevents the custard from contracting too rapidly; rapid contraction is the mechanical cause of the surface crack that runs across the top of cheesecakes baked at home.
After the oven rest, transfer the cheesecake to a wire rack at room temperature for an additional 30 minutes, then move it to the refrigerator. Chill for a minimum of 6 to 8 hours; overnight is strongly preferred. The custard structure is not fully set until it has spent sufficient time at refrigerator temperature. Cutting before this point will result in a soft, wet interior regardless of how correctly it was baked.
Do not cover the cheesecake with plastic wrap while it is still warm. Condensation will form on the surface and drip back onto the top, causing soft spots and surface blemishes. Once the cheesecake is fully cold, cover loosely with foil or plastic wrap.
The Easy No-Bake Biscoff Cheesecake Variation
This version requires no oven time and contains no eggs, making it a reliable option for hot weather, households with egg allergies, or bakers who want a straightforward, eggless Biscoff cheesecake without monitoring oven temperatures.
The Biscoff cookie crust preparation remains identical to the baked version. However, instead of baking the crust at 350°F, press it into the springform pan and refrigerate it for 30 minutes until firm.
The Filling — Two Setting Agent Options
Option 1 — Whipped Cream Method (No Gelatin): Whip heavy cream to stiff peaks in a chilled bowl, then gently fold it into a mixture of softened cream cheese and Biscoff cookie butter that has been beaten smooth. The air incorporated into the cream provides lift and lightness, and the fat content of the heavy cream provides stability. Once assembled, the cheesecake requires a minimum of 4–6 hours of refrigeration to achieve a sliceable set.
This method produces a slightly softer, mousse-like texture. It is best served well-chilled and sliced with a clean, warm knife.
Option 2 — Gelatin Method (Firmer, Cleaner Slices): Bloom powdered gelatin in cold water for 5 minutes, then gently melt it over a double boiler or in short microwave bursts, keeping the temperature below 212°F (100°C). Overheating gelatin destroys its setting ability. Whisk the melted gelatin into the cream cheese and cookie butter base before folding in the whipped cream.
Gelatin-set fillings hold cleaner slices at warmer ambient temperatures and are the better choice if the cheesecake will be transported or served at an outdoor gathering.
Balancing the Sweetness
Add a generous splash of fresh lemon juice to the filling base, approximately 1–2 tablespoons, and mix it in thoroughly. Biscoff cookie butter is heavily sweet and rich; the lemon juice does not make the filling taste citrusy, but it cuts through the density and prevents the finished slice from being one-dimensional on the palate.
Keep the baked and no-bake instructions strictly separate in your workflow. There are no eggs in this variation, no oven step, and no water bath. The two methods are distinct processes that produce distinctly different textures and should not be combined or confused.
Assembly, Decorating, and the Biscoff Drip Finish
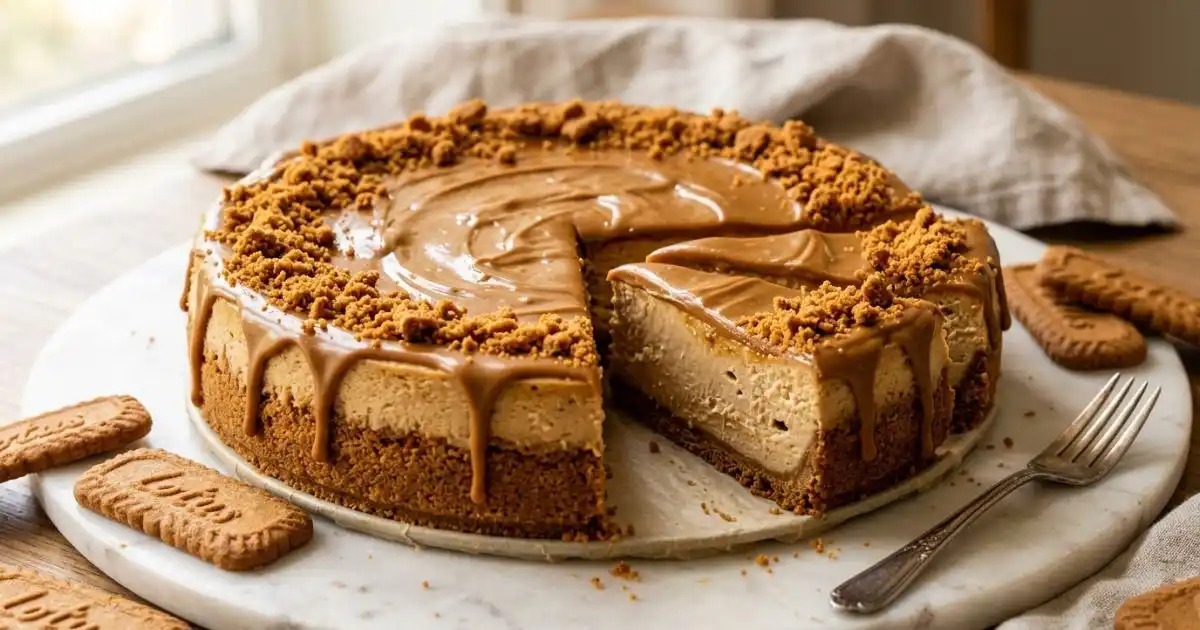
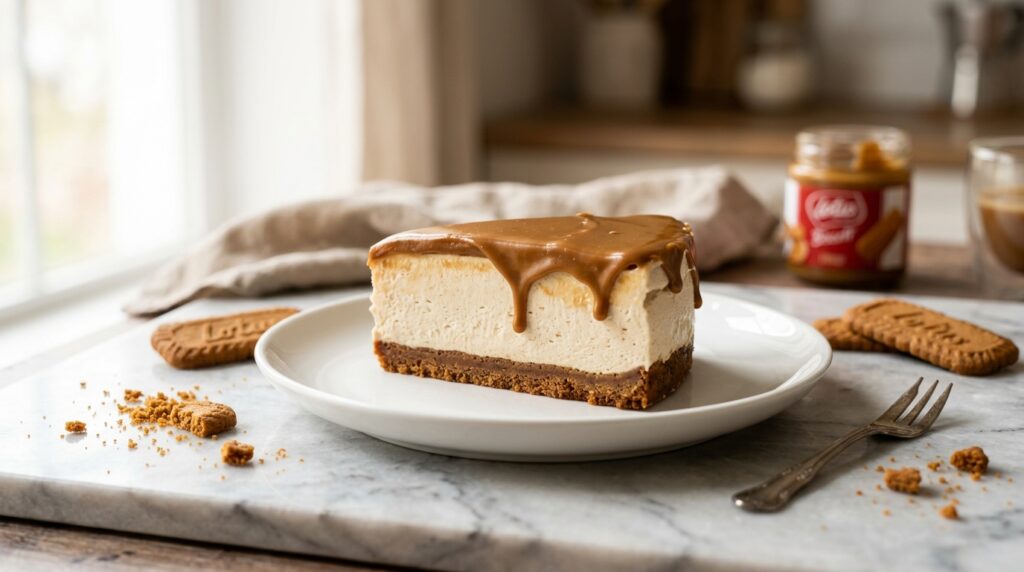
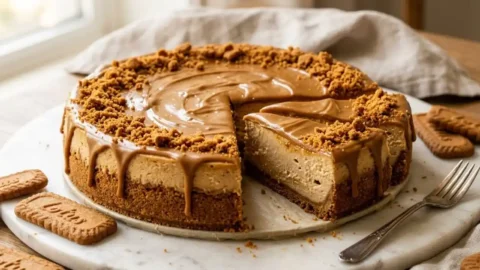
A clean, professional presentation distinguishes a home-baked cheesecake from something worth photographing. The melted cookie butter drip is the signature decorative element here, achievable without any specialist equipment.
Step 1 — Melt the Cookie Butter. Spoon the remaining Biscoff spread into a microwave-safe bowl. Microwave in 15–20 second bursts, stirring between each, until the spread is fluid and pourable. You want it runny enough to drip slowly down a vertical surface when pushed, but not so hot that it will melt the chilled surface of the cheesecake on contact. If it becomes too thin, allow it to cool for 2–3 minutes before proceeding.
Step 2 — Create Controlled Drips: Transfer the melted spread to a piping bag or a resealable plastic bag with a small corner cut off. The opening should be no larger than 3mm to maintain control. Work around the outer edge of the fully chilled cheesecake, applying small, even pressure to create drips of consistent length. Push the tip slightly over the edge of the cake before squeezing to initiate each drip; the weight of the spread will pull it down the side.
Step 3 — Fill the Center: Once the border drips are set, fill the center of the top surface with the remaining melted spread. Smooth it to an even layer with an offset spatula, working from the center outward. The result should be a glossy, flat center flanked by clean drips on the sides.
Step 4 — Garnish Finish the border of the top surface, the ring between the outer drip edge and the center, with finely crushed Lotus Biscoff biscuit crumbs. Press them gently in place. They add textural contrast and reinforce the Lotus Biscoff cookie crust visual identity of the dessert.
Timing Note: Apply the cookie crumb garnish no more than 1–2 hours before serving. Crumbs left on the surface for longer than 12 hours will absorb moisture from the filling and lose their texture entirely.
Dietary Modifications
Gluten-Free Biscoff Cheesecake
The structural and flavor identity of this cheesecake depends on the speculoos flavor profile, the caramelized spice character unique to Biscoff biscuits. Generic gluten-free cookies will not replicate this, and the result will be a generic cheesecake with a neutral crust, not a Biscoff cheesecake.
For a gluten-free Biscoff cheesecake recipe that maintains its character, use certified gluten-free Speculoos cookies; the Schär brand produces a widely available gluten-free Speculoos that closely matches the original flavor profile. If they are unavailable locally, supplement your chosen gluten-free cookies with a small quantity of DIY speculoos spice mix blended into the crumb: a pinch each of ground cinnamon, ground nutmeg, ground ginger, and ground cloves will approximate the aromatic signature.
Vegan Version
A vegan Biscoff cheesecake requires attention to two areas: the cream cheese base and the filling’s structural mechanism.
Use a block-style vegan cream cheese rather than a tub-style spread; the same high-moisture issue that affects conventional tub cream cheese applies to most vegan alternatives. For the filling structure, either whipped coconut cream (chilled overnight and whipped from the solidified cream layer only) or a starch-stabilized vegan cream will provide the necessary body. The Lotus Biscoff biscuits and the original Lotus Biscoff spread are both suitable for vegans; verify the packaging for your specific market’s formulation.
Replace butter in the crust with a quality vegan butter block (not a spread); the higher water content of vegan spreads can leave the crust greasy.
Storage, Freezing, and Serving Tips
Refrigeration
Store the cheesecake in an airtight container or covered tightly with foil in the refrigerator. It will keep in good condition for up to 4 days. Note that any cookie crumb garnish applied to the top surface will begin to soften and lose texture within 12 hours of application; if you are making the cheesecake in advance, hold the crumb garnish and apply it close to serving time.
Freezing
Yes, you can freeze Biscoff cheesecake, and it freezes well if handled correctly. The key is to freeze individual slices rather than a whole cake; it allows you to defrost only what you need and avoids the textural degradation that comes from repeatedly bringing a large cheesecake in and out of temperature range.
Wrap each slice tightly in plastic wrap, then wrap again in a layer of aluminum foil to prevent freezer burn. Freeze for up to 3 months. Thaw overnight in the refrigerator, never at room temperature, which promotes condensation and an unpleasant wet texture on the surface.
Slicing for Clean Portions
The difference between a professional-looking slice and a smeared one is blade temperature and cleanliness.
- Bring a tall jug of hot water to the table beside the cheesecake.
- Dip a long, sharp, non-serrated knife into the water for 5 seconds.
- Wipe the blade completely dry with a clean kitchen towel.
- Make a single, decisive cut. Do not saw.
- Repeat the dip-and-wipe process before every single cut.
This technique prevents the cold filling from dragging and smearing along the blade, which is the cause of the ragged, layered edge that appears on cheesecake slices cut with a dry knife.
Whether you choose the structured patience of the baked method or the efficient simplicity of the no-bake version, a Biscoff cheesecake made with careful attention to ingredients and technique is a high-return project. The flavor combination does the heavy lifting — your job is simply not to get in its way.
F.A.Q
Can I make the baked version without a water bath?
Yes, but the risk of surface cracking and a rubbery texture increases. If you want to avoid wrapping your springform pan in foil, you can use the Steam Alternative Method. Place a deep baking pan or oven-safe dish filled with one inch of boiling water on the oven rack directly beneath the cheesecake. This maintains the necessary oven humidity to prevent cracks without any direct contact between the water and the springform pan.
Why is my no-bake Biscoff cheesecake runny and not setting?
A runny no-bake cheesecake is usually the result of under-whipped heavy cream or warm ingredients. Ensure you whip your heavy cream to stiff peaks before folding it into the cream cheese base; soft peaks do not provide enough structure. Additionally, ensure your cream cheese is softened but not warm, and that your melted Biscoff cookie butter has cooled to room temperature before mixing. For a guaranteed firm set that holds clean slices, utilize the **gelatin setting method** detailed in the recipe.
Can I freeze Biscoff cheesecake?
Yes, Biscoff cheesecake freezes remarkably well. For the best results, slice the chilled cheesecake first. Wrap each individual slice tightly in plastic wrap, followed by a layer of heavy-duty aluminum foil to prevent freezer burn. Store in the freezer for up to 3 months. Thaw the slices overnight in the refrigerator before serving. Do not thaw at room temperature, as this causes condensation to form on the surface, ruining the texture.
Can I use crunchy Biscoff spread instead of smooth?
You can use crunchy Biscoff spread for the topping and decoration, but it is not recommended for the cheesecake batter. The filling of both the baked and no-bake versions relies on a completely smooth, velvety emulsion. Incorporating crunchy spread into the batter can make the filling feel grainy rather than silky. Stick to creamy Biscoff spread for the filling, and save the crunchy version for a textured top layer if desired.
What is the best way to get clean, professional slices?
Cheesecake is dense and sticky, which causes standard knives to drag and tear the filling. To get clean slices, dip a long, sharp, non-serrated knife into a tall jug of hot water for 5 seconds. Wipe the blade completely dry with a clean kitchen towel, and make a single, clean slice. Repeat the dipping and wiping process before every single cut. This warms the blade slightly, allowing it to glide through the fats smoothly without smearing.
Nutrition Per Slice — Baked Version
| Nutrient | Per Slice (1/12) |
| Calories | 561 kcal |
| Total Fat | 40.4g |
| Saturated Fat | 21.8g |
| Total Carbs | 43.2g |
| Sugar | 30.4g |
| Protein | 7.6g |
| Sodium | 323mg |
Nutrition Per Slice — No-Bake Version (Whipped Cream Method)
| Nutrient | Per Slice (1/12) |
| Calories | 563 kcal |
| Total Fat | 44.5g |
| Saturated Fat | 24.9g |
| Total Carbs | 35.9g |
| Sugar | 23.0g |
| Protein | 6.1g |
| Sodium | 305mg |
The Complete Guide to Biscoff Cheesecake: Classic Baked & Easy No-Bake Methods
Equipment
- 9-inch (23 cm) springform pan
- Food processor
- Stand mixer or hand mixer
- Large roasting pan
- Offset spatula
- Mixing bowls
- Wire rack
Ingredients
Crust
- 250 g Lotus Biscoff biscuits finely crushed
- 75 g unsalted butter melted
Baked Filling
- 680 g full-fat brick-style cream cheese room temperature
- 150 g granulated sugar
- 120 g full-fat sour cream room temperature
- 130 g Lotus Biscoff cookie butter
- 3 large eggs room temperature
Topping
- 130 g Lotus Biscoff cookie butter for drip topping
- 3 Lotus Biscoff biscuits finely crushed for garnish
No-Bake Filling Option
- 480 ml heavy cream whipped to stiff peaks
- 15 ml fresh lemon juice 1–2 tablespoons, to taste
- 7 g powdered gelatin optional for firmer slices
- 45 ml cold water for blooming gelatin
Instructions
- Preheat the oven to 175°C (350°F). Pulse the Biscoff biscuits in a food processor until finely crushed.
- Mix the biscuit crumbs with melted butter until the mixture resembles damp sand.
- Press firmly into the bottom and slightly up the sides of a 23 cm springform pan.
- Bake the crust for 8 minutes, then cool completely before adding the filling.
- Beat the room-temperature cream cheese and sugar together until completely smooth and lump-free.
- Add the sour cream and Biscoff cookie butter and mix until just combined.
- Add the eggs one at a time on low speed, mixing only until incorporated.
- Pour the batter into the cooled crust and smooth the surface with an offset spatula.
- Bake at 167°C (325°F) for 50–60 minutes until the edges are set and the center retains a slow wobble.
- Cool the cheesecake in the switched-off oven with the door slightly open for 1 hour.
- Transfer to a wire rack for 30 minutes, then refrigerate for at least 6–8 hours or overnight.
- For the no-bake version, chill the crust for 30 minutes instead of baking.
- Beat cream cheese and Biscoff cookie butter until smooth, then fold in whipped cream.
- Add lemon juice and, if desired, dissolved gelatin for a firmer set.
- Spread the filling into the chilled crust and refrigerate for 4–6 hours until set.
- Melt Biscoff spread and create decorative drips around the chilled cheesecake.
- Fill the center with melted spread, smooth with an offset spatula, and garnish with crushed Biscoff biscuits before serving.
Notes
Last Updated on June 22, 2026 by Janelle
