
Cream Cheese Corn Recipe (Stovetop & Baked Casserole)
Plain boiled corn has its place, somewhere around the back of the pantry, behind the can of forgotten soup. But the moment you introduce a block of cold, dense, full-fat cream cheese to a skillet of sweet summer kernels, something extraordinary happens. The dairy fat coats each kernel like a tailored glove, the natural corn sugars caramelize against the heat, and within ten minutes, you’re plating something that rivals the creamed corn at a $60-a-plate steakhouse.
This isn’t your grandmother’s corn casserole, or rather, it is, but elevated. On this page, we’re consolidating two distinct search intents into one definitive guide: a quick 10-minute stovetop cream cheese corn for Tuesday nights when dinner is already late, and a baked cream cheese corn casserole worthy of anchoring your Thanksgiving or Christmas spread. Both versions share the same foundational magic, a velvety dairy emulsion clinging to sweet, plump kernels, but their personalities are entirely their own.
Table of Contents
Stovetop vs. Baked: Which Method Should You Choose?
Before a single kernel hits a pan, let’s settle the method debate. The table below is your fast-track decision tool for cream cheese corn in any context.
| Cooking Method | Texture & Flavor Profile | Best Used For | Total Time |
|---|---|---|---|
| Stovetop | Thanksgiving, Christmas, potlucks, and make-ahead holiday entertaining | Weeknight dinners, quick BBQ sides, last-minute guests | ~10 minutes |
| Baked Casserole | Thicker, scoopable set; caramelized top with golden-brown edges; deeper, more complex sweetness | Thanksgiving, Christmas, potlucks, make-ahead holiday entertaining | ~40 minutes (10 prep + 30 bake) |
The quick verdict: If you’re deciding tonight, choose stovetop. If you’re planning a holiday side dish that needs to hold beautifully in a serving dish for two hours, bake it.
Grocery List for the Ultimate Creamy Corn
Ingredient quality is the architecture of this dish. Cutting corners here collapses the entire structure.
Sweet Corn: Fresh, Frozen, or Canned?
All three forms are viable; the preparation path is simply different for each.
- Fresh corn off the cob delivers the most textural contrast; the kernels arrive at the party with natural sweetness and a crisp snap that no processing can replicate. Stand each ear upright in a wide bowl and shave the kernels free with a downward stroke of your chef’s knife. Four medium ears yield roughly 3 cups.
- Frozen corn is the year-round workhorse and genuinely the best choice for weeknight stovetop cooking. Allow it to thaw fully on a kitchen towel so excess water evaporates before the kernels meet the fat. Introducing frozen water to a hot emulsion will break your sauce before it forms.
- Canned corn works beautifully in the baked casserole, where the longer oven time compensates for any residual canning liquid. Pour the contents into a fine mesh strainer and let gravity do the work for 2–3 minutes; pressing the kernels with a folded paper towel extracts the last of the packing liquid and prevents a watery casserole.
Full-Fat Block Cream Cheese: The Non-Negotiable
- Here is the food science: Block cream cheese is a dense, stabilized emulsion of fat, protein, and a modest percentage of moisture (~55% fat solids). Tub-style cream cheese spreads, even those labeled “original,” are mechanically whipped and formulated with additional water, gums (carrageenan, xanthan, locust bean), and sometimes added starches to achieve their spreadable consistency at refrigerator temperature. That supplemental moisture is the enemy of a stovetop sauce.
- When tub cream cheese hits a hot pan, the excess water flashes to steam, the fat and protein structures separate instead of cohering, and you’re left with a grainy, broken sauce that no amount of stirring will rescue. Block cream cheese, by contrast, melts in a controlled, progressive way: the fat begins releasing at around 90°F, the proteins soften gradually, and the entire block integrates smoothly into surrounding liquids to form a stable, glossy emulsion. This is the only path to silky cream cheese corn.
Supporting Cast
- 3 tablespoons unsalted butter: the initial fat layer that tempers the heat and begins the flavor foundation
- ¼ cup whole milk or heavy cream: heavy cream produces a richer, more indulgent sauce; whole milk yields a lighter consistency for the stovetop version
- 1 teaspoon granulated sugar; this is not about making the dish sweet; it’s about enhancing the corn’s existing natural sweetness, which can dull during cooking. Think of it as a flavor amplifier, not a dessert ingredient.
- ½ teaspoon garlic powder
- ¼ teaspoon onion powder
- Kosher salt and freshly cracked black pepper: to taste, added at the finish
Method 1: The 10-Minute Stovetop Cream Cheese Corn
This is creamed corn shortcut territory at its most satisfying. Ten minutes from cold pan to serving bowl. The technique is about building and maintaining an emulsion: never rushing the heat.
What You’ll Need
- 3 cups corn kernels (thawed frozen, or fresh off the cob)
- 8 oz full-fat block cream cheese, cut into rough 1-inch cubes and allowed to temper at room temperature for 15 minutes
- 3 tablespoons unsalted butter
- ¼ cup whole milk or heavy cream
- 1 teaspoon granulated sugar
- ½ teaspoon garlic powder
- ¼ teaspoon onion powder
- Kosher salt and cracked black pepper
Step-by-Step Instructions
Step 1: Build the fat foundation. Position a wide, heavy-bottomed skillet (12-inch cast iron or stainless steel) over medium heat. Once the surface warms, you’ll know it’s ready when a drop of water skids across and evaporates in under two seconds. Introduce the butter and allow it to liquify into a shimmering, pale-gold pool. Do not let it brown; you’re building a neutral fat foundation, not introducing nutty complexity yet.
Step 2: Welcome the kernels. Tumble the corn kernels into the butter bath and allow them a full 2 minutes of undisturbed contact with the heat. This brief interval allows the natural sugars on the kernel surface to begin their gentle caramelization. You’ll see the color shift from pale to a deeper, golden-edged yellow. Stir once, then allow another 60 seconds of contact.
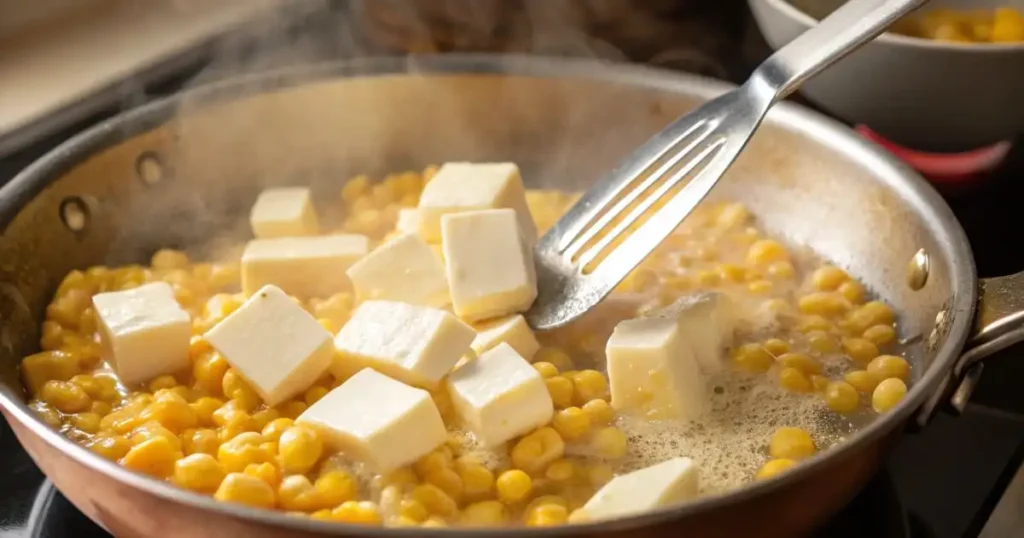
Step 3: Introduce the dairy. Pour the milk or heavy cream directly over the corn, then nestle the cream cheese cubes throughout the skillet. Reduce the heat to medium-low. The cream cheese will resist at first, holding its shape stubbornly against the warmth. Be patient; within 60 to 90 seconds, the cubes will begin their softening descent. Use a flexible silicone spatula to encourage the melting process, folding the softened cheese into the liquid in slow, deliberate strokes until the sauce achieves a cohesive, glossy consistency.
Step 4: Season and emulsify. Scatter the sugar, garlic powder, and onion powder, and fold again. The sauce should now coat the back of a spoon cleanly, with enough body to cling to each kernel. Taste, then season assertively with kosher salt and cracked pepper; this dish can absorb more seasoning than you might expect. The sugar, salt, and fat are working together to coax every dimension of flavor from the corn.
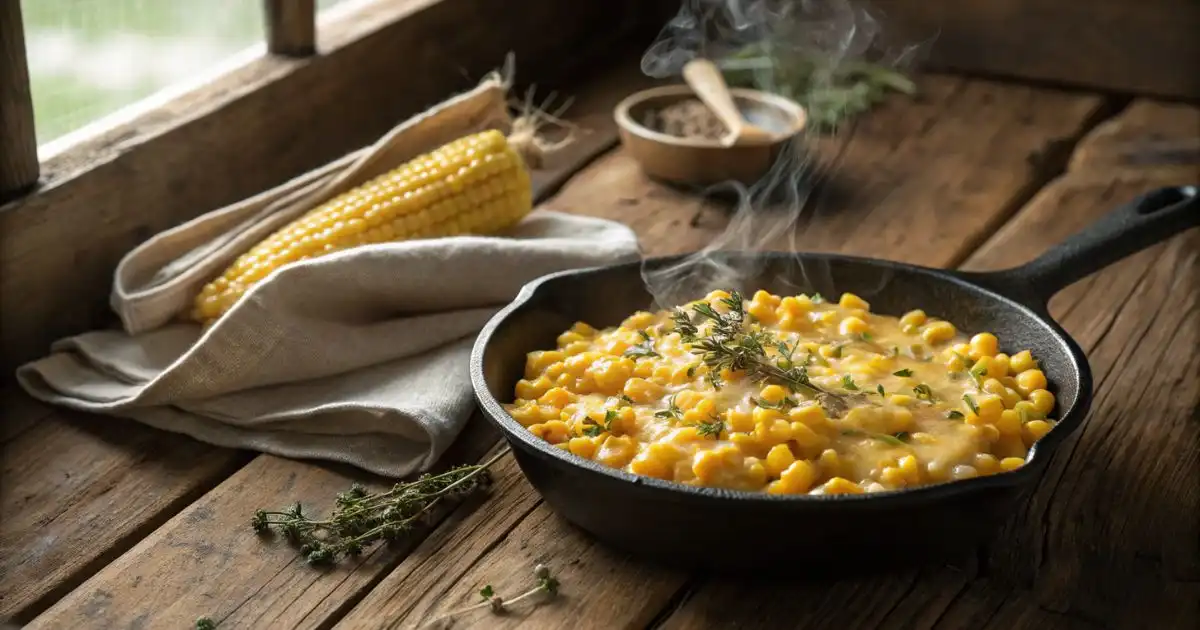
Step 5: Serve immediately. Transfer to a warm serving bowl and finish with an optional crack of fresh pepper. The sauce will continue to thicken slightly as it rests, so if it tightens too aggressively, a small splash of warm milk re-establishes the silky emulsion instantly.
10-Minute Stovetop Cream Cheese Corn
Ingredients
Main Ingredients
- 3 cups corn kernels thawed frozen or fresh
- 8 oz cream cheese cut into cubes, room temperature
- 3 tbsp unsalted butter
- 0.25 cup whole milk or heavy cream
- 1 tsp granulated sugar
- 0.5 tsp garlic powder
- 0.25 tsp onion powder
- to taste kosher salt
- to taste black pepper freshly cracked
Instructions
- Heat a wide, heavy-bottomed skillet over medium heat. Add the butter and allow it to melt into a smooth, pale-gold liquid without browning.
- Add the corn kernels and let them cook undisturbed for 2 minutes to encourage light caramelization. Stir once, then cook for another minute.
- Pour in the milk or cream and add the cream cheese cubes. Reduce heat to medium-low. Stir gently as the cream cheese softens and melts, forming a smooth, glossy sauce.
- Add sugar, garlic powder, and onion powder. Stir to combine until the sauce thickens and coats the corn. Season with salt and pepper to taste.
- Serve immediately in a warm bowl. If the sauce thickens too much, add a splash of warm milk to loosen it.
Notes
Method 2: The Baked Cream Cheese Corn Casserole
This is the corn casserole with cream cheese that earns a permanent spot on the holiday rotation. It begins on the stovetop, because you cannot shortcut proper flavor development, and finishes in the oven, where dry heat caramelizes the edges into something deeply sweet and irresistible.
What You’ll Need
Everything from the stovetop recipe, plus:
- 1 additional tablespoon of butter (for greasing the baking dish)
- 2 eggs, lightly beaten (the structural binding agents that give the casserole its scoopable body)
- ¼ cup sour cream (adds a subtle tang that balances the sweetness and helps the casserole set)
- Optional: ¼ cup shredded sharp cheddar for the top
Step-by-Step Instructions
Step 1: Preheat and prepare. Set your oven to 350°F. Coat a 2-quart (or 9×13-inch for a crowd) baking dish generously with softened butter, ensuring the corners and lower sides receive full coverage; these are the zones where the casserole is most likely to adhere.
Step 2: Build the base on the stovetop. Follow Steps 1 through 4 of the stovetop method above, but pull back slightly before full emulsification is achieved. You want the cream cheese 90% incorporated, with the sauce just barely cohesive. Remove from heat and allow the mixture to cool for 5 full minutes; this temperature rest is critical before the eggs join the party.
Step 3: Temper and bind. Whisk the beaten eggs and sour cream together in a small bowl. Slowly fold this mixture into the slightly cooled corn base, working in a slow circular motion from the outside of the skillet inward. The eggs, if introduced too aggressively to a hot mixture, will scramble rather than bind; this gradual incorporation prevents that.
Step 4: Transfer and top. Pour the entire mixture into the prepared baking dish, using a spatula to coax every last ribbon of sauce free from the skillet. If using cheddar, scatter it across the surface in an even layer. It will melt, bubble, and ultimately form the golden-brown crown this casserole deserves.
Step 5: Bake until the edges sing. Slide the dish onto the center rack and bake for 28 to 32 minutes, until the center is set (a gentle shake of the dish should produce only a slight, unified wobble, not a liquid slosh), and the edges have developed an aggressively bubbling, caramelized border. For additional browning, switch to the broiler for the final 2 to 3 minutes, watching closely.
Step 6: Rest before serving. Allow the casserole a 10-minute rest outside the oven before cutting. This resting window allows the internal structure to firm, ensuring clean, scoopable portions rather than a collapsing pool on the serving spoon.


Baked Cream Cheese Corn Casserole
Ingredients
Base Ingredients
- 3 cups corn kernels thawed frozen or fresh
- 8 oz cream cheese cut into cubes, room temperature
- 3 tbsp unsalted butter
- 0.25 cup whole milk or heavy cream
- 1 tsp granulated sugar
- 0.5 tsp garlic powder
- 0.25 tsp onion powder
- to taste kosher salt
- to taste black pepper freshly cracked
Casserole Additions
- 1 tbsp butter for greasing
- 2 eggs lightly beaten
- 0.25 cup sour cream
- 0.25 cup sharp cheddar cheese optional, shredded
Instructions
- Preheat the oven to 180°C (350°F). Generously grease a baking dish with butter, ensuring all corners are well coated.
- Prepare the stovetop corn base by melting butter in a skillet, adding corn, then stirring in milk and cream cheese until mostly combined but not fully smooth. Remove from heat and let cool for 5 minutes.
- In a bowl, whisk together the eggs and sour cream. Slowly fold this mixture into the slightly cooled corn base, stirring gently to avoid scrambling the eggs.
- Transfer the mixture into the prepared baking dish. Spread evenly and sprinkle shredded cheddar on top if using.
- Bake for 28–32 minutes until the center is set and the edges are bubbling and golden. For extra browning, broil for 2–3 minutes at the end.
- Let the casserole rest for 10 minutes before serving to allow it to firm up for clean portions.
Notes
Chef-Approved Upgrades and Mix-Ins
The base recipe is a canvas. These additions are the paint.
- The Smoky Bacon Crunch. Render 4 strips of thick-cut bacon in the skillet before beginning the butter step, remove and reserve, then use the rendered fat in place of (or alongside) the butter. Crumble the crispy bacon back over the finished dish, whether stovetop or baked, immediately before serving, preserving its structural integrity.
- The Jalapeño Popper Twist. Char 2 fresh jalapeños directly over a gas flame (or under a broiler) until blistered and blackened, then peel, seed, and finely dice. Fold into the corn mixture along with 2 tablespoons of softened cream cheese beyond the standard amount. The char introduces a smoky depth that plays beautifully against the sweet corn, and the residual heat of the jalapeño cuts through the richness of the dairy.
- The Parmesan Garlic Finish. In the final 30 seconds of stovetop cooking (or scattered across the baked casserole top before the last 8 minutes in the oven), introduce ⅓ cup of freshly grated Parmigiano-Reggiano. Unlike pre-shredded bagged Parmesan, which contains anti-caking agents that resist melting, freshly grated Parmigiano dissolves into the sauce and adds a savory, umami-forward complexity that transforms cream cheese corn from a side dish into a conversation piece.
Make-Ahead, Storage, and Reheating Rules
Prepping Ahead for Thanksgiving and the Holiday Table
The baked casserole is perhaps the most holiday-friendly dish in this guide precisely because it can be assembled entirely in advance. Prepare the stovetop base, fold in eggs and sour cream, transfer to the buttered baking dish, and cover tightly with plastic wrap pressed directly against the surface of the mixture (this prevents a skin from forming). Refrigerate for up to 48 hours. On the day of serving, remove from the refrigerator 30 minutes before baking to take the chill off, then bake as directed, adding approximately 5 minutes to the total time to account for the cold start.
Storing Leftovers
Both versions store well in an airtight container in the refrigerator for up to 4 days. The casserole can also be frozen in individual portions (wrapped tightly in plastic then foil) for up to 2 months, thaw overnight in the refrigerator before reheating.
The Crucial Reheating Protocol
This is where most people destroy their leftovers. Do not microwave cream cheese corn directly. The microwave heats dairy unevenly and at too high a localized temperature, causing the fat and water components to violently separate. The result is greasy, grainy, broken cream corn that bears no resemblance to what you plated the day before.
Instead: return the corn to a small saucepan over medium-low heat. Add 1 to 2 tablespoons of whole milk or heavy cream per cup of leftovers before turning on the heat. As the mixture warms, stir continuously in a slow, looping figure-eight pattern. The added cold dairy re-introduces the emulsifying liquid the original sauce needs to re-cohere, and the gentle heat allows the fat and proteins to re-establish their relationship without fracturing. Within 4 to 5 minutes, the sauce will be glossy, smooth, and largely indistinguishable from its just-cooked state.
Frequently Asked Questions
Can I use low-fat cream cheese or Neufchâtel cheese?
The short answer is no, and understanding why will save you a ruined dinner. Neufchâtel and low-fat cream cheese have significantly reduced fat content (Neufchâtel sits at roughly 23% fat compared to full-fat’s 33%), and their protein-to-fat ratios are structurally different. When these lower-fat versions are introduced to heat, the reduced lipid content cannot form the stable fat network that keeps the sauce smooth. The proteins, with insufficient fat to cushion them, cluster into visible granules, producing a noticeably grainy, broken sauce that no technique can fully rescue. This isn’t a snobbishness about calories, it’s basic emulsion chemistry.
Is cream cheese corn the same thing as traditional Southern creamed corn?
No, and the distinction is meaningful. Traditional creamed corn is built on a flour roux, butter, and flour cooked together to form a starch-thickened base, into which corn milk (the starchy liquid scraped from the back of fresh cob after cutting) is slowly incorporated. It’s a labor-intensive, deeply savory preparation that derives its creaminess from the corn’s own internal starch. Cream cheese corn is a thoroughly modern dairy shortcut: the cream cheese simultaneously acts as the thickener, fat source, and flavor agent, eliminating the roux entirely. The resulting dish is richer, more indulgent, and substantially faster than its traditional counterpart, though both have legitimate, irreplaceable places on the table.
Can I double the recipe for a crowd?
Absolutely. For the stovetop version, use two skillets run simultaneously rather than overcrowding a single pan; a crowded skillet traps steam and prevents proper caramelization. For the baked casserole, a doubled batch fits perfectly into a 9×13-inch baking dish; add approximately 8 to 10 minutes to the baking time and verify doneness by the edge-set test rather than the clock.
What proteins pair best with this as a holiday side dish?
The richness of cream cheese corn makes it an ideal foil for proteins with strong, caramelized exterior crust, prime rib, smoked brisket, roasted turkey, or glazed ham. It also bridges beautifully between grilled chicken and a summer table. The sweet, dairy-forward profile cuts through the fat of red meat and amplifies the smoke notes in anything barbecued.
Have you given our recipe a try ?
There are no reviews yet. Be the first one to write one.
Last Updated on March 21, 2026 by Janelle
