

The Ultimate Guide to Homemade Yogurt Cheese (Labneh)
Looking for a simple and delicious way to make yogurt cheese at home? This creamy, tangy spread is made by straining plain yogurt, and it’s easier than you think. In this step-by-step guide, I’ll show you exactly how to turn regular yogurt into a protein-rich, probiotic-packed cheese that’s perfect for dips, spreads, sauces, and more. If you’re ready to upgrade your kitchen game with something healthy and versatile, let’s get started.
Table of Contents
Key Benefits
Protein Powerhouse: Did you know that yogurt cheese is a fantastic source of protein? It packs a punch, often containing even more protein than regular yogurt. So, if you’re looking to boost your protein intake, this is a delicious way to do it!
Gut-Friendly Goodness: We all know how important gut health is, and this recipe delivers! Because we are starting with yogurt, it’s loaded with beneficial probiotics that can help keep your digestive system happy and thriving.
Studies have shown that fermented dairy products like yogurt and yogurt cheese may support gut microbiota balance and overall digestive health [source].
Goodbye Lactose, Hello Flavor: If you’re sensitive to lactose, you’ll appreciate this. The straining process reduces much of the lactose found in regular yogurt, making it a more comfortable option for those with sensitivities.
Ultimate Versatility: I mean it when I say this is a kitchen chameleon! This isn’t just something you eat with a spoon, you can use your homemade yogurt cheese in so many ways. Spread it on toast, use it as a base for dips, or incorporate it into your favorite sauces – the possibilities are endless! It’s both a delicious and a simple culinary addition.
Budget-Friendly and Fun: Let’s be real, buying fancy dips can get expensive. Making your own yogurt cheese is surprisingly cost-effective and so much fun. You’ll have a blast seeing how a few simple steps transform plain yogurt into a luscious treat! Plus, who doesn’t love the satisfaction of creating something delicious yourself?
Creamy and Tangy Perfection: Finally, let’s not forget the amazing taste and texture! The finished product is incredibly creamy, with a delightful tang that I know you’ll crave. This isn’t some bland, ordinary dairy; it’s a flavor experience that I can’t wait for you to try.
Ingredients
Ingredients:
- 32 oz (4 cups) Plain Yogurt (Full-fat recommended, but any plain, unflavored type will work)
- Pinch of Salt (Optional)
- Cheesecloth or Tea Towel
- Bowl
- Fine-Mesh Strainer
- Rubber Band or String (Optional, for securing cheesecloth)
Plain Yogurt, the Star of the Show:
You’ll want about 32 ounces (that’s roughly 4 cups) of plain, unflavored yogurt. I usually go for full-fat yogurt because it makes the yogurt cheese extra creamy, but if you prefer a lower-fat option, that works too—just note that your end result might be a bit less rich and creamy. The key is to use good-quality, unflavored yogurt. Avoid Greek yogurt, as it is already strained.
A Pinch of Salt (Optional but Recommended):
This is where you have a choice. A small pinch of salt (about ¼ teaspoon) can help draw out more of the whey and enhance the flavor, but it’s totally optional. If you’re watching your sodium intake, you can absolutely skip it and still end up with a delicious batch of homemade yogurt cheese.
Tools :
- A Bowl: You’ll need a medium to large-sized bowl to catch all that lovely whey (the liquid that separates from the yogurt).
- Cheesecloth: The unsung hero of this process. You will need some cheesecloth or a thin, clean tea towel, or nut milk bag for straining. I usually use a few layers of cheesecloth for a good result. If using a tea towel, make sure it’s clean and doesn’t have any lint.
- A Fine-Mesh Strainer: This will sit perfectly inside the bowl, creating a secure space for the cheesecloth and yogurt to do their magic. Make sure it fits securely over the bowl.
- A Rubber Band or String (Optional): This is just to secure the cheesecloth once the yogurt is inside. If you don’t have one, you can just carefully tie up the corners.
Instructions: Step-by-Step
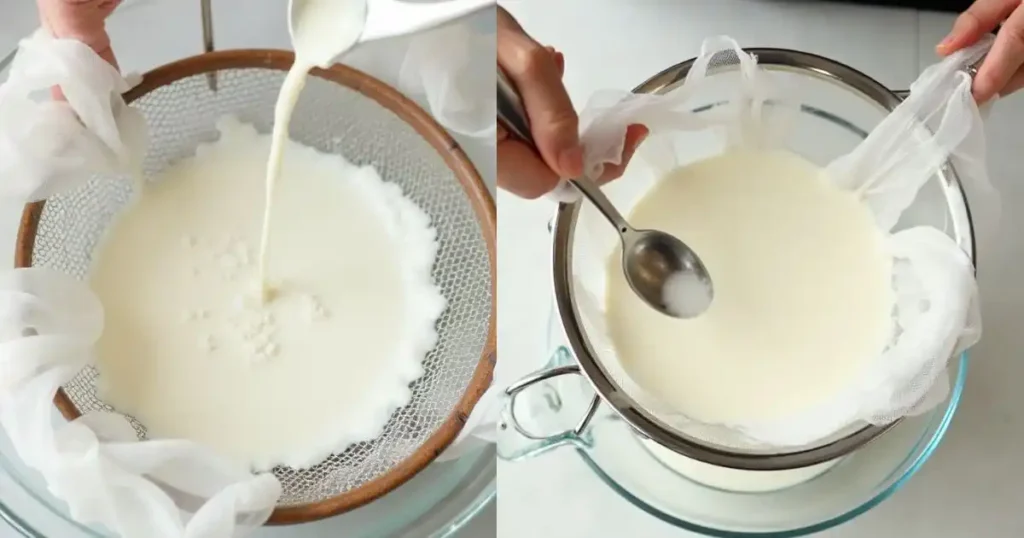
Prepare Your Straining Station:
- First, take your fine-mesh strainer and place it securely over the bowl. This is going to be your base for the magic to happen. It’s essential the strainer sits nicely and won’t move while we work.
- Now, line your strainer with a few layers of cheesecloth or a clean tea towel, making sure it covers the entire base and sides. This creates a cozy little nest for our yogurt.
Pour in the Yogurt:
- Gently pour the plain yogurt into the cheesecloth-lined strainer. If you’re using the salt, sprinkle it evenly over the yogurt at this stage.
Wrap It Up:
- Carefully gather the edges of the cheesecloth together, creating a little pouch around the yogurt. You can secure this pouch with a rubber band or some kitchen string. The goal is to have a nice tight package that allows the whey to drain away. If you don’t have anything on hand, you can carefully tie up the corners.
Time for the Chill Zone:
- Now, gently transfer the bowl with the strainer and wrapped yogurt into your refrigerator. This is where time does its work. Let it sit and drain for at least 12 to 24 hours. This is the key to getting that thick, creamy consistency. The longer it sits, the thicker it gets.
The Big Reveal!
- Once the draining time has passed, carefully remove the bowl from the fridge. Gently unwrap the cheesecloth or tea towel to reveal your beautiful yogurt cheese. It should be nice and thick, with a spreadable consistency.
- Transfer the drained cheese to a clean container. This homemade yogurt cheese is now ready to be used in all your favorite recipes. Don’t throw out the liquid whey; it’s got some amazing uses for baking.
A Few Tips From Me to You:
- Don’t Rush the Process: The draining time is crucial; patience is key!
- Gentle Handling: Be gentle with the yogurt when transferring it and securing the cheesecloth to avoid spills.
- Observe the Texture: The longer it drains, the thicker it becomes. Adjust the draining time to your preferred consistency.
Yogurt Cheese vs. Greek Yogurt vs. Labneh
| Feature | Yogurt Cheese | Greek Yogurt | Labneh |
|---|---|---|---|
| Base Ingredient | Plain regular yogurt | Plain regular yogurt | Plain regular yogurt |
| Straining Time | 12–24 hours | 4–6 hours | 24–48 hours |
| Texture | Thick, creamy, spreadable | Smooth, spoonable | Dense, soft cheese-like |
| Flavor | Mildly tangy | Lightly tangy | Rich and tangy |
| Protein Content | High | High | Very high |
| Lactose Level | Lower than yogurt | Lower than yogurt | Lowest of the three |
| Best Uses | Spreads, dips, sauces, and desserts | Spreads, savory dips, and Middle Eastern dishes | Spreads, savory dips, Middle Eastern dishes |
| Storage Life | 5–7 days refrigerated | 5–7 days refrigerated | Up to 7 days refrigerated |
| Other Names | Soft yogurt cheese | Strained yogurt | Middle Eastern yogurt cheese |
Quick Takeaway
- Greek yogurt is the thickest version, perfect for spooning or mixing into breakfast bowls.
- Yogurt cheese is your ideal creamy spread — smooth, rich, and easy to use in both sweet and savory dishes.
- Labneh is the most concentrated and cheese-like, with a deep tang and dense texture.
Pro Tips and Variations
The Draining Game
Speed it Up (Carefully!)
If you’re short on time, you can gently squeeze the cheesecloth every few hours to release extra whey. Just avoid squeezing too hard, or the texture may become grainy.
Expert Tip: For the creamiest texture, let the yogurt drain slowly in the fridge for 24 hours. The cold temperature keeps the flavor mild and the texture smooth.
Check for Doneness
You’ll know your yogurt cheese is ready when it’s thick and spreadable, similar to soft cream cheese. If it feels loose, let it drain longer.
Storage Savvy
Proper Storage:
Keep your yogurt cheese in an airtight container in the fridge for up to 5–7 days.
💡 Expert Tip: Place a paper towel on top before sealing the lid, it absorbs any remaining moisture and helps the cheese stay firm.
Freezing:
You can freeze yogurt cheese, but the texture might change slightly after thawing. It may separate or become grainy, but it’s still usable for cooking and baking.
Troubleshooting Tips
Too Sour?
If it’s too tangy, use a milder yogurt next time or reduce the draining time slightly.
Expert Tip: Stir in a teaspoon of olive oil or cream after straining — it balances acidity and adds extra richness.
Not Draining?
Check that your cheesecloth isn’t too thick or clogged. Using a fresh piece often fixes the issue.
Expert Tip: Place the setup on the top shelf of your fridge. The steady airflow improves drainage and keeps the texture even.
Creative Variations to Try
Savory Sensations:
Mix in herbs like dill, chives, or parsley with a touch of garlic for a bright, herby spread.
Expert Tip: Add flavor after straining — this keeps the yogurt’s live cultures active and prevents watery texture.
Sweet Treats:
Blend in honey, vanilla, or a pinch of cinnamon for a lightly sweet, dessert-style cheese.
Spice it Up:
Try a dash of chili flakes or smoked paprika for a subtle kick.
Serving Suggestions
The Perfect Spread:
- Spread it generously on your morning toast, crackers, or bagels. Add some sliced tomatoes, cucumber, and a sprinkle of sea salt for a light and healthy start to the day.
- Use it as a delicious and healthy alternative to cream cheese on sandwiches and wraps. You’ll be surprised at how much flavor this adds.
Dips and Sauces:
- Whisk it into dips for veggies or pita bread. Add fresh herbs, garlic, or a drizzle of olive oil for extra flavor. It’s a great base for a healthy tzatziki or labneh.
- Use it to thicken soups or stews and give them a lovely creamy texture, without adding heavy cream.
Topping Power:
- Dollop a spoonful on roasted vegetables or baked potatoes for a cool and tangy contrast. It’s especially delicious on roasted sweet potatoes or cauliflower.
Elevate your Salads:
- Add a dollop to your salads to give a creamy and tangy component. It tastes delicious in grain-based salads or any green salad.
Savory Pastries:
- Use the cheese as a filling for savory pastries or tarts. You can mix it with spinach, feta, or roasted vegetables.
Sweet Delights:
Parfait Perfection:
- Layer your yogurt cheese with granola, fresh fruit, and a drizzle of honey or maple syrup for a quick and healthy parfait. This makes an ideal light breakfast or afternoon treat.
Smoothie Booster:
- Add a spoonful to your smoothies for a boost of protein and a creamy texture. It pairs wonderfully with berries and banana.
Sweet Toppings:
- Enjoy it with a drizzle of honey or a dollop of fruit compote for a quick dessert or snack.
- Use it as a substitute for whipped cream on your favorite desserts.
Baking:
- Use it as a frosting alternative for cakes and cupcakes, adding a touch of tartness to your desserts.
- Mix it into your favorite baking recipes as a replacement for cream cheese.
What to Do with Yogurt Cheese
Once you’ve made your homemade yogurt cheese, the next question is: what now? Don’t worry—this creamy creation has endless uses. Spread it on toast, use it as a tangy base for dips, mix it into sauces or soups for richness, or enjoy it with roasted vegetables for extra flavor. You can even turn it into a sweet snack with honey and fruit, or layer it into parfaits. It’s incredibly versatile, so don’t be afraid to experiment.
Want to explore more high-protein, dairy-based recipes? Try this simple and healthy cottage cheese egg flatbread—it’s a perfect partner for your homemade yogurt cheese.


Homemade Yogurt Cheese (Labneh)
Ingredients
Yogurt Cheese Base
- 32 oz Plain Yogurt (full-fat recommended) Avoid Greek yogurt as it is already strained.
- 1 pinch Salt Optional, enhances flavor and helps draw out whey.
Instructions
- Prepare Your Straining Station: Place a fine-mesh strainer over a medium or large bowl. Line it with a few layers of cheesecloth or a clean tea towel, ensuring it covers the sides and bottom completely.
- Pour in the Yogurt: Gently pour the plain yogurt into the cheesecloth-lined strainer. If using salt, sprinkle it evenly over the yogurt at this stage.
- Wrap It Up: Gather the edges of the cheesecloth to form a pouch around the yogurt. Secure with a rubber band or kitchen string, ensuring the yogurt is snug inside.
- Refrigerate and Drain: Transfer the bowl and strainer setup to the refrigerator. Let it drain for 12–24 hours, depending on your desired consistency. The longer it drains, the thicker the yogurt cheese becomes.
- Unwrap and Store: After draining, carefully remove the cheesecloth and transfer the yogurt cheese to a clean, airtight container. Store in the refrigerator for up to 7 days.
- Optional Step: Save the leftover whey for use in baking, smoothies, or soups for added nutrition and flavor.
Notes
Conclusion
And there you have it – delicious, homemade yogurt cheese! This simple recipe unlocks a world of creamy, tangy goodness, ready to elevate countless meals. It’s versatile, healthy, and incredibly satisfying, proving that amazing food doesn’t need to be complicated. Embrace your inner chef, get creative with flavors, and enjoy the process of crafting this kitchen staple. Now, it’s your turn! Go make your own batch and share your favorite ways to enjoy it. I can’t wait to see your creations! Don’t hesitate to ask questions – happy cheese-making!
FAQs
Frequently Asked Questions About Yogurt Cheese:
Can I use any type of yogurt?
Yes and no! You want to use plain, unflavored yogurt. Full-fat yogurt will give you the richest and creamiest result, but low-fat versions also work, they just might not be quite as decadent. Avoid Greek yogurt, as it is already strained.
What if I don’t have cheesecloth?
No worries! You can use a clean tea towel, a nut milk bag, or even several layers of paper towels. Just make sure whatever you use is clean and lint-free. The key is to have something that will allow the whey to drain while containing the yogurt.
Can I freeze yogurt cheese?
You can freeze it, but keep in mind that the texture might change a bit after thawing. It might become slightly grainy, and the water content may separate a bit, but it’s still safe to eat. If freezing, I recommend doing so in an airtight container for up to 2-3 months.
What can I do with the leftover whey?
Don’t throw it away! The whey that is left after straining your yogurt cheese is packed with nutrients. You can use it in baking, smoothies, or as a liquid base for soups and stews. It adds a slightly tangy flavor and a boost of nutrition.
How can I make my yogurt cheese less sour?
The sourness of the yogurt cheese will depend on the yogurt you use and the draining time. To reduce the sourness, use a milder yogurt as a base or shorten the draining time.
Can I add flavors before or after straining?
You can do either! Adding a pinch of salt before draining helps to enhance the flavor, but for other flavors, I recommend mixing them in after the straining process, for best results. That way, you don’t risk altering the texture while the whey is draining
Have you given our recipe a try ?
There are no reviews yet. Be the first one to write one.
Last Updated on October 8, 2025 by Janelle
