
Strawberry Crunch Cheesecake: Easy Recipe & Tips
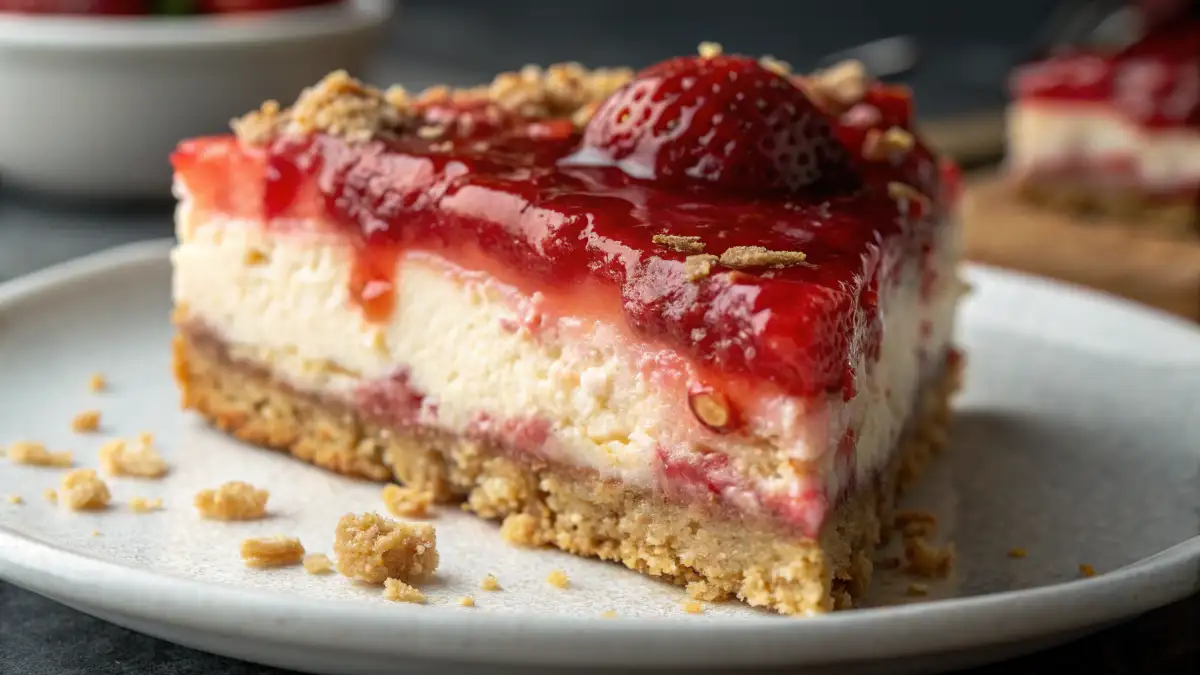
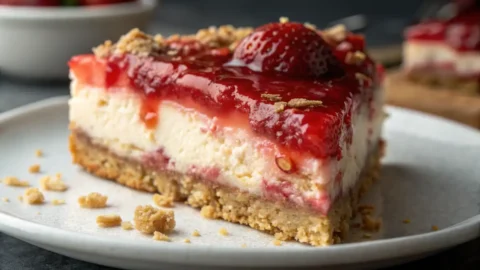
This strawberry crunch cheesecake combines creamy filling with a crunchy golden Oreo crust and a sweet strawberry topping. You get three textures in one dessert: the crisp base, smooth centre, and that signature crunch on top.
The recipe takes some time, but the steps are straightforward. You’ll need about 90 minutes of active work, plus overnight chilling. The result is a dessert that looks impressive and tastes even better.
Table of Contents
Quick Verdict
- Best for: Anyone who wants a show-stopping dessert for birthdays, holidays, or weekend gatherings
- Main benefit: The strawberry crunch topping adds a unique texture you won’t find in regular cheesecake recipes
- Main drawback: Requires overnight chilling, so you can’t make this the same day you plan to serve it
Why You’ll Love This Recipe
The Perfect Balance of Textures
- You get four distinct layers in every bite. The golden Oreo crust provides crunch at the bottom. The cheesecake filling is dense and creamy. The strawberry syrup adds moisture. And the final crunch topping brings it all together.
- This isn’t a no-bake strawberry cheesecake. Baking gives you a firmer texture that holds up better when you add toppings.
Not Too Sweet, Just Right
- Many strawberry dessert recipes go overboard with sugar. This one balances the sweet strawberry elements with tangy cream cheese and sour cream. The result doesn’t make your teeth hurt.
- The dried strawberries in the crust add fruit flavour without extra moisture. Fresh strawberries would make the crust soggy.
Great for Special Occasions
- This cheesecake looks fancy enough for a dinner party. But the ingredients are simple. You probably have most of them already.
- It serves 10-12 people easily. That makes it more practical than making individual strawberry crunch bars for a crowd.
Ingredients Needed
For the Crust Base
- 24 golden Oreo cookies (not regular Oreos—the golden ones work better here)
- 1 cup freeze-dried strawberries, crushed into small pieces
- 2 tablespoons strawberry-flavoured gelatin powder (the dry mix, not prepared)
- 4 tablespoons unsalted butter, melted and slightly cooled
For the Cheesecake Filling
- 32 ounces cream cheese (that’s four 8-ounce blocks), softened to room temperature
- 1½ cups granulated white sugar
- 4 large eggs, brought to room temperature
- ⅓ cup sour cream (full-fat works best)
- 1 tablespoon pure vanilla extract (or vanilla bean paste for stronger flavour)
- ½ teaspoon fine salt
- 2 tablespoons all-purpose flour
For the Strawberry Crunch Topping
- ½ cup strawberry syrup (store-bought or homemade—your choice)
- 1 cup of the reserved Oreo-strawberry crumb mixture
- 1 cup American buttercream frosting or stabilised whipped cream
- Fresh strawberries for garnish (optional but nice)
Quick note: The recipe makes extra crumb mixture on purpose. You’ll use part of it for the crust and save the rest for topping.
How to Make Strawberry Crunch Cheesecake
Preparing Your Crust
- Step 1: Heat your oven to 350°F. Place your eggs in a bowl of warm tap water now; they need 5 to 7 minutes to lose their chill. Cold eggs don’t mix well into the batter.
- Step 2: Add the golden Oreos and freeze-dried strawberries to a food processor. Pulse until you get fine crumbs. You want the texture of coarse sand, not powder.
- Step 3: Measure out 1 cup of this mixture and set it aside in a bowl. This is for your topping later.
- Step 4: Take the remaining crumb mixture and add the melted butter plus the strawberry gelatin powder. Mix with a fork until all the crumbs look slightly damp. The mixture should hold together when you squeeze it, but it shouldn’t look greasy or wet.
- Step 5: Pour these coated crumbs into a 9-inch springform pan. Press down firmly with the bottom of a measuring cup. You want an even layer with no gaps. Press up the sides about half an inch if you can.
- Step 6: Bake this crust for 10 minutes at 350°F. This sets it so it won’t get soggy later. Take it out and reduce your oven temperature to 325°F immediately.
Making the Creamy Filling
- Step 7: Put your softened cream cheese in a large mixing bowl or the bowl of a stand mixer. Beat on low speed for about 2 minutes. You’re removing lumps, not adding air. Scrape down the sides twice during this step.
- Step 8: Add the sugar and continue beating on low until it disappears into the cream cheese. This takes another minute or so.
- Step 9: Add your room-temperature eggs one at a time. After each egg, stop the mixer and scrape the bowl. Then beat for 15 seconds before adding the next egg. This prevents lumps that are hard to remove later.
- Step 10: Add the vanilla extract, sour cream, salt, and flour. Mix just until you can’t see streaks anymore. Overmixing at this stage adds air bubbles that can crack your cheesecake.
- Step 11: Pour this batter slowly into your springform pan with the pre-baked crust. Tap the pan gently on your counter three or four times to release hidden air bubbles.
Baking Your Cheesecake
- Step 12: Find a roasting pan or any oven-safe pan larger than your springform. Place your cheesecake pan inside it. This is your water bath setup—it keeps the cheesecake moist and prevents cracks.
- Step 13: Carefully pour hot water into the larger pan until it comes up about 1 inch on the sides of your springform. Don’t splash water into the cheesecake batter.
- Why this matters: The water bath regulates temperature. Without it, the edges of your strawberry cheesecake recipe will overcook before the centre sets.
- Step 14: Bake at 325°F for 75 minutes. The centre should still jiggle slightly when you gently shake the pan. It will firm up as it cools. If the edges start browning too much, tent foil loosely over the top.
- Step 15: Turn off the oven but leave the cheesecake inside with the door closed for 15 minutes. Then crack the door open and let it sit for another 15 minutes. This gradual cooling helps prevent cracks.
- Step 16: Remove the cheesecake from the water bath. Let it cool on your counter to room temperature—this takes at least an hour. Don’t rush this step by refrigerating it while it’s still warm.
- Step 17: Once completely cool, cover the pan with plastic wrap and refrigerate overnight. Six hours is the minimum, but overnight is better. This firms up the texture so it slices cleanly.
Adding the Final Topping
- Step 18: Remove the springform ring carefully. Run a thin knife around the edge first if it seems stuck.
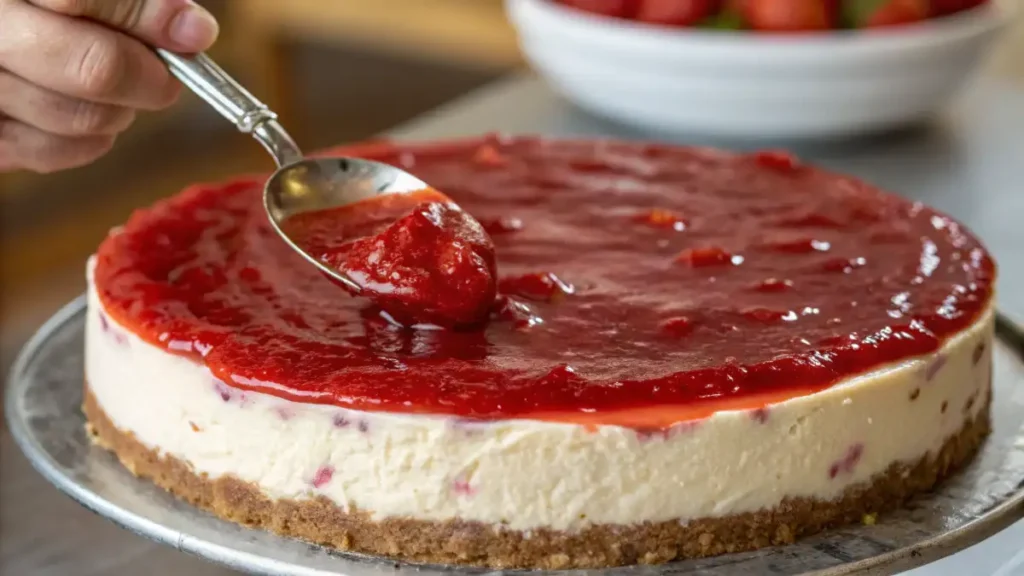
- Step 19: Pour the strawberry syrup over the top of the chilled cheesecake. Use the back of a spoon to spread it evenly, leaving about a half-inch border around the edge if you want a cleaner look.
- Step 20: Sprinkle the reserved Oreo-strawberry crumb mixture over the syrup-covered top. Press gently so it sticks. Cover the entire surface for that classic strawberry crunch look.
- Step 21: Pipe or spoon small dollops of buttercream around the edge. Add fresh strawberries if you’re using them. Your strawberry shortcake cheesecake is ready to serve.
- A 9-inch springform pan is essential. Regular cake pans don’t work, you can’t remove the cheesecake without destroying it.
- A food processor makes crushing the cookies easy. Without one, put them in a sealed plastic bag and crush with a rolling pin.
- An electric mixer (stand or hand) is important. Mixing cream cheese by hand is exhausting and gives lumpy results.
- You’ll also need a roasting pan large enough to hold your springform pan with space around it for water.
Strawberry Crunch Cheesecake Recipe
Ingredients
Crust Base
- 24 cookies golden Oreo cookies
- 1 cup freeze-dried strawberries, crushed
- 2 tbsp strawberry-flavored gelatin powder
- 4 tbsp unsalted butter, melted
Cheesecake Filling
- 32 oz cream cheese, softened
- 1.5 cups granulated sugar
- 4 large eggs, room temperature
- 1/3 cup sour cream
- 1 tbsp pure vanilla extract
- 1/2 tsp fine salt
- 2 tbsp all-purpose flour
Strawberry Crunch Topping
- 1/2 cup strawberry syrup
- 1 cup reserved Oreo-strawberry crumb mixture
- 1 cup American buttercream or stabilized whipped cream
- fresh strawberries (optional)
Instructions
- Preheat oven to 350°F. Warm eggs in a bowl of warm water for 5–7 minutes.
- Pulse golden Oreos and freeze-dried strawberries into fine crumbs.
- Reserve 1 cup of the crumb mixture for topping.
- Add melted butter and gelatin powder to remaining crumbs and mix well.
- Press crumbs into a 9-inch springform pan to form the crust. Bake 10 minutes; reduce oven to 325°F.
- Beat cream cheese until smooth, then mix in sugar.
- Add eggs one at a time, mixing gently and scraping the bowl.
- Mix in vanilla, sour cream, salt, and flour just until combined.
- Pour filling over crust and tap pan to release air bubbles.
- Place cheesecake in a water bath and bake 75 minutes at 325°F.
- Cool gradually in the oven, then on the counter. Refrigerate overnight.
- Remove springform ring and top cheesecake with strawberry syrup.
- Sprinkle the reserved crumb mixture across the surface.
- Pipe buttercream around the edge and garnish with fresh strawberries.
Notes
Serving and Storage Tips
How to Serve
- Let the cheesecake sit at room temperature for 10 minutes before slicing. This makes cutting easier and improves the flavor. Cold cheesecake doesn’t taste as rich.
- Use a sharp knife dipped in hot water, then wiped dry. Make one clean cut straight down. Wipe the knife after every slice for neat edges.
- This dessert is rich. Small slices are enough. A 9-inch cheesecake serves 12 people comfortably.
Storing Leftovers
- Cover the cheesecake loosely with plastic wrap and refrigerate. It stays fresh for 4 to 5 days. The crunch topping will soften slightly over time, but it still tastes good.
- If you want to keep the topping extra crunchy, store it separately in an airtight container at room temperature. Add it to individual slices as you serve them.
Can You Freeze This Cheesecake?
- Yes, but freeze it before adding the strawberry syrup and crunch topping. Wrap the plain baked cheesecake tightly in plastic wrap, then in aluminium foil. It keeps for up to 2 months.
- Thaw it in the refrigerator overnight. Add the toppings just before serving. Frozen cheesecake with the crunch already on top gets soggy when it thaws.
Helpful Notes
Common Mistakes to Avoid
- Using cold ingredients: Cold cream cheese creates lumps that never fully disappear. Cold eggs don’t incorporate smoothly. Set everything out 1 to 2 hours before you start.
- Skipping the water bath: Your cheesecake will crack without it. The edges will dry out while the centre stays underdone. The water bath isn’t optional.
- Overmixing the batter: Once you add the eggs, mix gently. Too much air creates bubbles that become cracks when baked.
- Not chilling long enough: A warm or barely cool cheesecake won’t slice cleanly. The filling needs time to firm up properly.
Ingredient Substitutions
- For the crust: Regular golden sandwich cookies work if you can’t find golden Oreos. Avoid chocolate cookies, they change the colour and flavour too much.
- For dried strawberries: Freeze-dried works better than regular dried because they’re crunchier. You can find them at most grocery stores in the dried fruit section or near the cereal.
- For the topping: Cool Whip or stabilised whipped cream works instead of buttercream. The flavour is lighter and less sweet.
- For a no-bake version: You can make a no-bake strawberry cheesecake using this same crust and topping. Replace the baked filling with a gelatin-set cream cheese mixture. The texture will be lighter and fluffier.
Equipment You’ll Need
FAQ
How is strawberry crunch cheesecake different from regular cheesecake?
The main difference is the topping. Regular cheesecake might have fruit or sauce on top. This one has a crunchy mixture of crushed cookies and dried strawberries that adds texture. The base also uses golden Oreos mixed with strawberry pieces instead of plain graham crackers.
Can I make this without a springform pan?
Not easily. You need to remove the cheesecake from the pan to add the topping and serve it. Regular cake pans don’t have removable sides. You could use a 9-inch pie pan and serve slices directly from it, but you won’t get the full strawberry crunch effect on the sides.
Why did my cheesecake crack?
Usually, this happens because of temperature shock. Opening the oven door during baking, skipping the water bath, or cooling the cheesecake too quickly all cause cracks. The good news is that the strawberry syrup and crunch topping hide any cracks completely.
Can I use a strawberry crumble topping instead?
Yes, but it changes the texture. A strawberry crumble cheesecake has a softer, more cake-like topping. The strawberry crunch topping used here stays crispier because of the dried strawberries and gelatin powder. Both taste good, but they’re different styles.
How long does this cheesecake need to chill?
Minimum 6 hours, but overnight is better. The filling needs time to firm up completely. If you cut into it too early, the slices will be messy, and the filling might seem too soft in the center.
Where can I buy freeze-dried strawberries?
Most regular grocery stores carry them now. Check the dried fruit aisle, the baking section, or near the breakfast cereals. You can also order them online. A small bag is usually enough for this recipe, with some left over for snacking.
Have you given our recipe a try ?
There are no reviews yet. Be the first one to write one.
